|
|
|
Categories
|
|
Information
|
|
Featured Product
|
|
|
 |
|
|
There are currently no product reviews.
 ;
The manual was a perfect match and was exactly what I was looking for. I'm very satisfied with my purchase.
;
Thank you for having the manual I needed for an older model Aiwa stero I had found on Ebay --- I wanted the Aiwa because I had tapes and cd's but I did not have a manual as to how to operate the system... I found what I needed and it has enabled me to set the system up for my enjoyment.
;
I wished detailed information of the JBL S310 and here I found it! Very happy with the service from this site!
;
The manual was very helpfull, it answerdes all my questions, and i was surprized to find the original manual on this site! Big thumbs uP:)
 ;
helpful manual.good service.Quick response.will use again
Adjusting control
the oven temperature
Broiling
The Broiler Drawer is located below the oven door. Always broil with the oven door closed.
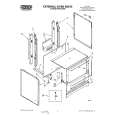
The oven vent
Does your oven seem hotter or colder than your old oven? The temperature of your old oven may have shifted gradually without you noticing the change. Your new oven is properly adjusted to provide accurate temperatures. But, when compared to your old oven, the new design may give you different results. If, after using the oven for a period of time, you are not satisfied with the temperature settings, they can be adjusted by following these steps:
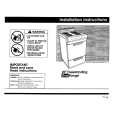
Hot air and moisture escape from the oven through a vent located under the backguard. The vent is needed for air circulation. Do not block the vent. Poor 1. Pull the broiler drawer open. Broiler door will tilt down when opened. baking/roasting will result. NOTE: Never store plastics, paper or
1. Push in and turn the Oven Temperature Control to the off position. Pull knob straight off.
When the oven is ON, pans and pan handles left near the oven vent can
Locking 2. Place broiler pan grid so grease can drain down sides into lower part of broiler pan. See picture. 3. Before broiler is turned on, place food on broiler pan and position the broiler pan at one of the three levels. Refer to a broiling chart in a reliable cookbook. 4. Push in and turn the Oven Temperature Control to BROIL. The broiler will automatically light in 5060 seconds. 5. When broiling is done, turn the Oven Temperature Control to OFF. NOTE: Do not preheat the broiler before using. Completely close the broiler drawer during broiling.
2. Loosen the locking screws. Note the position of the indicator.
To raise
To lower
3. To lower the temperature, turn knob skirt clockwise to move the indicator one marker line to the left. Each line equals about 10°F (5°C).
4. To raise the temperature,turn
knob skirt counterclockwise to move the indicator one marker line to the right. Each line equals about 10°F (5°C). Tighten the locking screws and
replace the control knob.
Page 6
|
|
|
> |
|