|
|
|
Categories
|
|
Information
|
|
Featured Product
|
|
|
 |
|
|
There are currently no product reviews.
 ;
I purchased the unit from a private party and the original owners manual was not available. Having the ability to download it was extremely helpful and clarified operating the equipment immensely. This is a complicated unit and without the manual I would not have been able to maximize it's potential. Thank you.
;
Being a user of older radios of many kinds, preferring them over more modern rigs, this manual was invaluable in the programming of my two. I now know for certain what the assorted buttons functions are, and am very grateful to have found this excellent site. Many thanks for your assistance, Tony.
 ;
Clear and easy to read. All details as expected. Price acceptable , and quick delivery.
;
Quick response and exactly what I was looking for and at a great fair price!
;
5 star quality on these downloadable manuals. Easy to read and all the information is there. A must when doing a custom install or needing to service your precious old school electronics.
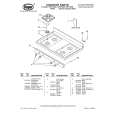
To Clean:
1. Remove the burner cap from the burner base and clean according to �General Cleaning� section. 2. Clean the gas tube opening with a damp cloth. 3. Clean clogged burner ports with a straight pin as shown. Do not enlarge or distort the port. Do not use a wooden toothpick. If the burner needs to be adjusted, contact a trained repair specialist.
To Clean:
1. Remove the surface burner grates. 2. Lift-up the cooktop. See the �Lift-up Cooktop� section. 3. Clean clogged burner ports with a straight pin as shown. Do not enlarge or distort the port. Do not use a wooden toothpick. If the burner needs to be adjusted, contact a trained repair specialist.
4. Replace the burner cap, making sure the alignment pins on the cap are properly aligned with the burner base.
4. Close the cooktop. 5. Replace surface burner grates. 6. Turn on the burner. If the burner does not light, do not service the open burner yourself. Contact a trained repair specialist.
1
Lift-up Cooktop
(on some models)
2
The lift-up cooktop provides easy access for cleaning beneath. Be careful not to drop the cooktop. Damage could occur to the finish and the cooktop frame. For more information, see the �General Cleaning� section.
1. Incorrect 2. Correct
To Lift:
1. Lift up the cooktop by both front corners until the supports lock into place.
5. Turn on the burner. If the burner does not light, check cap alignment. If the burner still does not light, do not service the sealed burner yourself. Contact a trained repair specialist.
OPEN SURFACE BURNERS (on some models)
Burner ports: Check burner flames occasionally for proper size and shape as shown below. A good flame is blue in color, not yellow. Keep this area free of soil and do not allow spills, food, cleaning agents or any other material to enter the burner ports.
Ports
1" 2
To Replace:
1. Lift the cooktop from both sides while pressing the support rods back to unlock them. 2. Slowly lower the cooktop into place.
7
|
|
|
> |
|