|
|
|
Categories
|
|
Information
|
|
Featured Product
|
|
|
 |
|
|
There are currently no product reviews.
 ;
Good quality instructions manual. Very useful to me. Quick and excellent service from Owner-Manuals... Thanks !!!
;
Sono molto soddisfatto e, quando mi necessiterà, mi avvarrò nuovamente di questo servizio!
;
A comprehensive Operating and Service Manual. All schematics are complete and easy to read. The PCB drawings and complete parts list are very helpful. I would definitely recommend this manual.
;
SCANNING OF HIGH QUALITY
VERY, VERY HIGH VELOCITY DOWNLOAD
VERY GOOD PRICE,
TRUE SATISFIED, THANKS
;
Genuine Toshiba owner's manual. Couldn't really ask for more. And written in understandable English in contrast to a few recent experiences I have had with manuals for other equipment other than Toshiba but made in China and written in "Chinglish"!
OVEN USE
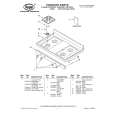
Electronic Clock/Timer
1 2 3
Timer
The Timer can be set in minutes and seconds or hours and minutes and counts down the set time. The Timer does not start or stop the oven.
To Set:
1. Press TIMER. The colon will flash during Timer programming. To display the time of day while the Timer is counting down, press CLOCK. Time of day will be displayed 5 seconds before returning to the Timer countdown. 2. Press the �up� or �down� arrow pads to set length of time. 3. Press TIMER. The Timer will begin counting down 5 seconds after the time is set. When there is one minute of time remaining, a single tone will sound and the display will begin counting down in seconds. When the Timer reaches zero, the display will show �End� and four 1-second tones will sound.
5
4
To Cancel: Press TIMER twice in the Timer mode.
1. Clock 2. Display
3. Increase 4. Decrease
5. Timer
Oven Temperature Control
IMPORTANT: Do not use a thermometer to measure oven temperature because opening the oven door and element or burner cycling may give incorrect readings. The oven provides accurate temperatures; however, it may cook faster or slower than your previous oven, so the temperature calibration can be adjusted. It can be changed in Fahrenheit only. A minus sign means the oven will be cooler by the displayed amount. No sign means the oven will be warmer by the displayed amount. Use the following chart as a guide. ADJUSTMENT °F 10°F 20°F 30°F -10°F -20°F -30°F COOKS FOOD ...a little more ...moderately more ...much more ...a little less ...moderately less ...much less
Display
When power is first supplied to the appliance, everything on the display will light up for 5 seconds. Then, the time of day and �PF� will appear on the display. Any other time �PF� appears, a power failure occurred. Reset the clock. See �Clock� section. When the oven is not in use, the display will show the time of day.
Clock
This is a 12 hour clock and does not show a.m. or p.m.
To Set:
Before setting, make sure the oven and Timer are off. 1. Press CLOCK. The colon will flash during clock programming. 2. Press the �up� or �down� arrow pads to set the time of day. The time can be changed in either small or 10 minute increments by pressing a pad briefly or by pressing and holding a pad. 3. Press CLOCK. The colon will stop flashing when the clock is active.
To Adjust Oven Temperature Calibration:
1. Press and hold CLOCK until the oven display shows the current calibration, for example, �00�, if not yet adjusted or about 5 seconds. 2. Press the �up� or �down� arrow pads to increase or to decrease the temperature in 5°F amounts. The adjustment can be set between 35°F and -35°F. 3. Press CLOCK to enter the new temperature.
8
|
|
|
> |
|