|
|
|
Categories
|
|
Information
|
|
Featured Product
|
|
|
 |
|
|
There are currently no product reviews.
 ;
Exactly as described, the full user-manual (145 pages). Perfect.
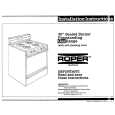
Using the electronic control
oven
The electronic oven control will turn the oven on and off at times you set ... even when you are not around. Automatic baking/roasting is ideal for foods which do not require a preheated oven, such automatic cycle for cakes, not use the as meats and casseroles. Do cookies, etc. ... undemking will
result.
now and stop automatically: . 1. Position the oven rack(s) properly and place the food in the oven. 2. Make sure the clock is set to the correct time-of-day. (See �Setting the clock� on page 5.) 3. Push the Cook Time button. �0:OO� will show in the large display and the HR indicator will come on. 4. Turn the Time/Temp Set Knob clockwise until the desired bakfng/ roasting time, up to 11 hours 55 minutes, shows in the large display. To see the start tune, push the Cook Time button and hold it for 3 seconds. 5. Push the Bake Temp button and set the desired temperature. The small display will show the set temperature and the time remaining. The OVEN, TIME, BAKE and ON indicators will come on. 6. The display will count down in 5and lo-minute increments. 7. When baking/roasting time is completed, the oven will turn off automatically, beep 3 times, and the time-of-day will show in the large display.
To start baking/roasting
To delay start and stop automatically: 1. Position the oven rack(s) properly and place the food in the oven. 2. Make sure the clock is set to the correct time-of-day. (See �Setting the clock� on page 5.) 3. Push the Cook Time button. �0:OO� will show in the large display and the HR indicator will come on. 4. Turn the Time/Temp Set Knob clockwise until the desired baking/ roasting time shows in the large display. 5. Push the Stop Time button. The DELAY, OVEN, STOPand TIME indicators will come on. Turn the TimeITemp Set Knob clockwise until the desired stop time shows in the large display. The oven will beep once every 10 seconds until a baking/roasting temperature is selected. 6. Push the Bake Temp button and set the desired temperature. The BAKE indicator will come on. 7. Changes can be made at any time by pressing a command button. 8. When the start time is reached, the DELAY and OVEN indicators will go off. The display will show the set temperature and the ON indicator will come on. 9. When the baking/roasting time is completed, the oven will turn off automatically, beep 3 times, and the tune-of-day will show in the large display.
To cancel the oven control setting: n Push the SetlCancel button or turn the Time/Temp Set Knob until �0:OO� appears in the large display. The time-of-day will then show in the large display.
To avoid sidmess and food waste when using delay start:
nDonotusefoodsthatwillspoil
while waiting for axAcing to start, such as dishes with milk or eggs, meam soups, and cooked meats or fish. Any food that has to wait for cooking to start should be very cold or frozen before it is put in the 0veL MOST UNFROZEN FOODS SHOULDNEVER STAND MORE THAN TWO HOURS BEFORECOOKING STARTS. ADOnot use foods containing or yeast when baking powder using delay start. They will not rise properly. nDonotallowfoodtoremainin oven for more then two hours after end of cooking cycle.
.
Page 7
|
|
|
> |
|