|
|
|
Categories
|
|
Information
|
|
Featured Product
|
|
|
 |
|
|
There are currently no product reviews.
 ;
Very satisfied! I was searching for several days, but nope; till I discovered your webside and there it was at a very reasonable price. Keep up the good work!
Paul
Flanders
 ;
Generally speaking good copy; a few pages too hard contrast...
Good service and communication.
;
I purchased the unit from a private party and the original owners manual was not available. Having the ability to download it was extremely helpful and clarified operating the equipment immensely. This is a complicated unit and without the manual I would not have been able to maximize it's potential. Thank you.
;
Being a user of older radios of many kinds, preferring them over more modern rigs, this manual was invaluable in the programming of my two. I now know for certain what the assorted buttons functions are, and am very grateful to have found this excellent site. Many thanks for your assistance, Tony.
;
Clear and easy to read. All details as expected. Price acceptable , and quick delivery.
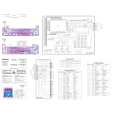
Installing the Receiver in a Japanese Car This receiver is designed for easy installation in most popular Japanese cars that have �ISO� (sidebracket) mounting system. If you have questions, ask your Blaupunkt dealer. 1. Remove the vehicle�s �bezel� trim piece and the remove the existing radio. 2. Unscrew the bolts on each side of the receiver to remove the trim ring. Save the trim ring in case you ever want to install the receiver in another vehicle. 3. Use the vehicle�s own mounting hardware to attach the unit. 4. With the detachable face removed, reinstall the vehicle�s bezel. 5. Only after the bezel in reinstalled, attach the face.
max. M5x8
NISSAN
max. &M5x8
TOYOTA
max.
max. M5x8
M5x8
MAINTENANCE Removing the Receiver Insert the �release handles� into the holes in the panel on the left and right of the receiver and push them in until you hear a distinct snap, which indicates the side springs are unlocked. Pull the unit out using both handles. (See Fig. 3) Note: Handles that have snapped into place can only be removed after you have pulled the receiver out of the complement. Remember where you store the �release handles�.
Fig. 3
Fuse Replacement When replacing the fuse, be sure to use one with the correct amperage, which will be stated on the fuse case. Never use a fuse that has a stated amperage exceeding the one supplied for this receiver as this could cause malfunction and serious damage to the receiver.
GB6
|
|
|
> |
|