|
|
|
Categories
|
|
Information
|
|
Featured Product
|
|
|
 |
|
|
There are currently no product reviews.
 ;
the Manual was made available as promised, the scans were excellent..Good Work !!!
;
It's complete and helpful manual with good quality of scan. Thanks very much.
;
The service was quick and simple, finding the service manual easy and it appears to be the original with colour schematics. It contained the info I was after and so sorted the problem.
I have copied it to CD and attached the envelope to the inside back cover of the owners manual. Good manual and excelent service. Robin Wood, Wood Electronics, New Zealand.
;
Exactly what was needed to assess the product - excellent value and great service
 ;
Nice to have the service manual for the Sony DCR-TRV345E now. The document is of excellent quality.
FS-P5
Remove the rear panel (See Fig.8 to 11)
Prior to performing the following procedure, remove the metal cover, rear cover and the CD mechanism Rear panel assembly. 1. Remove the seven screws G panel. attaching the rear
Joint a
F
Joint a
G G
2. Disconnect the card wire from CN902 on the main board. 3. Disengage the lower two joints b on each side of the rear panel using a screwdriver and remove the rear panel backward (The tuner board and the fan will be also detached.Remove them as needed).
G G
Fig.8
CN902 Fan Rear panel
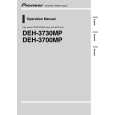
Removing the fan (See Fig.9 and 12)
Prior to performing the following procedure, remove Main board CN908 the metal cover, the rear cover andthe CD mechanism assembly. 1. Disconnect the wire from connector CN908 on the main board. 2. Remove the two screws H on the back of the body. Fig.9 3. Move the fan upwards to disengage the four joints c and release from the rear panel.
Tuner board
Rear panel Rear panel Fan Joint c Joint c
Joint b
Fig.10
H
Joint c
H
Joint c Joint b Rear panel
Fig.12
Fig.11
1-9
|
|
|
> |
|