|
|
|
Categories
|
|
Information
|
|
Featured Product
|
|
|
 |
|
|
There are currently no product reviews.
 ;
What can i say but i would have been lost without your support.
Thank You!
;
Très satisfait ! envoi rapide, Grand catalogue disponible. Many thanks !
;
Delivery came quite promptly and in a very readable format. Thank you.
;
I found my Clarion VRX8370R in the Camper I bought and I wasn't able for month to understand it.
The Owner Manual was perfect and just what I was searching for.
Thank you.
Leonardo
;
Very good copy of Manual, clear and easy to print off, arrived very promptly and reasonably priced.
Thanks, I will use you again.
RX-6030VBK
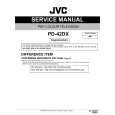
2.7 Removing the audio board (See Fig.9) � Prior to performing the following procedure, remove the top cover, rear panel, component video board, DSP board, audio input board, DVD board, video board, S Video board and tuner board. (1) From the top side of the main body, disconnect the card wire from the connector CN402 on the audio board. (2) Disconnect the relay board from the connectors (CN291, CN491) on the power supply board and audio board. (3) Disconnect the wires from the connectors CN471, CN472 and CN473 on the audio board. (4) Remove the three screws H attaching the audio board. (5) Loosen the screw J attaching the audio board.
CN472
Relay board
Power supply board CN291
CN471
CN473 Card wire
H J
Audio board CN402
CN491
H
Fig.9
2.8 Removing the speaker terminal board (See Fig.10) � Prior to performing the following procedure, remove the top cover and rear panel. (1) From the top side of the main body, remove the solders from the soldered sections a on the speaker terminal board.
Parallel wires
Soldered sections a Speaker terminal board Fig.10
(No.22026)1-7
|
|
|
> |
|