|
|
|
Categories
|
|
Information
|
|
Featured Product
|
|
|
 |
|
|
There are currently no product reviews.
 ;
Excellent concise manual. All needed information was included. Typeface and diagrams were clear. Very fair price considering what others are charging. Many thanks
 ;
Response is a little slow- I had to wait 12 hours to receive download link but it says that it may take up to 24hrs.
Manual is old and was not produced in PDF- scanned copy is exellent.
Overall- value for money- I recommend
;
Excellent quality and quickly delivered manuals at a fair price. Great care is taken in the reproduction process. Even photographs and highly detailed drawings are as clear as in the original. That cannot be said for some freelance manual copies I have obtained from the web. If you have exhausted your internet search of technical manuals, try Owner-Manuals.com. If they do not have it, I do not think it exists. Perhaps, if requested, they may be able to find it. Their resources are certainly greater than most. Shopping here certainly beats waiting for months or years for the manual you seek to appear in an internet auction or garage sale.
;
Very detailed product, also it is a scanning from original, very useful if you have to service this type of amplifier ! Very good product, very hard to find!
;
the Manual was made available as promised, the scans were excellent..Good Work !!!
AROUND THE DRUM
15 January 1992
6.2 PRE-TRANSFER LAMP REPLACEMENT
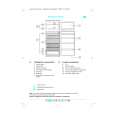
[F] [A] [D]
[C] [G] [B] [E] 1. Open the front cover. 2. Remove the upper inner cover (3 screws). 3. Remove the upper rear cover (2 screws). 4. Remove the following units:
� � �
Development unit (See Development Unit Removal.) Cleaning unit (See Cleaning Unit Removal.) Charge corona unit and wire cleaner (1 screw)
5. Hold down the top of upper unit and open the upper unit by pushing the release lever [A]. 6. Remove two fixing screws [B] securing the drum stay and pull out the drum unit [C] gently along the rail. NOTE: Cover the drum with some papers to prevent the drum from being exposed to light. 7. Remove the 2P connector [D] of the pre-transfer lamp [E] from the CN111 on the main board [F] (2 wire clamps). 8. Remove the PTL guide [G] with pre-transfer lamp from the copier (2 hooks). 9. Remove the pre-transfer lamp from the guide as shown. NOTE: Do not use alcohol to clean the pre-transfer lamp. This damages the resin in the LED cover.
5-48
|
|
|
> |
|