great site, the most easy and fastest way to find the manual you need, no 5 star because the manual was only available in german, but I speak german as well so no problem for me.
thanks for this download i got a pioneer bdp-lx70a blu-ray player and it had no manual i search everywhere on the internet and came across owner-manuals.com and i found that it was so easy to find and downloaded from this site if i ever need a manual again this would be the first place that i would come too thanks guys
Superb! It's the original manual. We can now use our old calculator with its full function.
Text excerpt from page 5 (click to view)
Installation
Unpacking
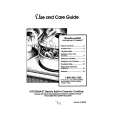
All transit bolts and packing must be removed before using the appliance. You are advised to keep all transit devices so that they can be refitted if the machine ever has to be transported again. 1. Using a spanner, unscrew and remove the two rear bottom screws. Slide out the two plastic pins. 6. Set the machine upright and remove the remaining rear screw. Slide out the relevant pin. 7. Plug all the holes with the plugs which you will find in the envelope containing the instruction booklet.
P1128
P0002
Positioning and levelling
P1129
P0001
2. Lay the machine on its back, taking care not to squash the hoses. This can be avoided by placing one of the corner packing pieces between the machine and the floor. 3. Remove the polystyrene block from the bottom of the machine and release the two plastic bags.
1 2 3
Install the machine on a flat hard floor. Make sure that air circulation around the machine is not impeded by carpets, rugs etc. Check that the machine does not touch the wall or other kitchen units. Carefully level by screwing the adjustable feet in or out. Never place cardboard, wood or similar materials under the machine to compensate for any unevenness in the floor.
P1124
4. Very carefully slide out the left polythene bag, removing it towards the right and then downwards. 5. Very carefully slide out the right polythene bag, removing it towards the left and then upwards.
P1051
Water inlet
Connect the water inlet hose to a tap with a 3/4" thread.