|
|
|
Categories
|
|
Information
|
|
Featured Product
|
|
|
 |
|
|
There are currently no product reviews.
 ;
This GRUNDIG UV5A Owner Manual is not only an instruction manual but a total functional circuit description of the Multimeter and includes circuit diagram at the end pages. It is very helpful for repairing and calibrating the instrument. It is written in two languages English and German for international support. It was very easy to repair my unit with this document. Regards, Regis Pauly, Electrical Engineer.
;
The owner's manual was evetything I thought it would be. I was able to print it out using both sides of the paper in quick order, saving me a search online for a used one.
 ;
Хорошее качество сканирования.
Мануал пришел часов эдак через 12. В целом доволен.
;
Fantastic quality and impressive delivery time. Based on this manual, I recommend this service without hesitation! Five Stars for certain.
;
Was happy to find the complete owners manual... It's all in there, just like the original...
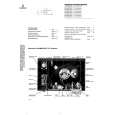
RECORDING
Note: � During recording, it is not possible to listen to another source.
CLOCK
VCD/CD Synchro Start
VCD MINI HIFI SYSTEM
DSC
O
NH
AL IM
T
J A
deck 1 and a blank tape into tape deck 2 with full spool to the left. 3 Press DUBBING � "DUB" with "2" scrolling right will be displayed. � Dubbing will start immediately. � The REC flag starts flashing. 4 Press � to stop dubbing.
the tracks are recorded according to the order on the selected disc. 3 Press RECORD to start recording. � The REC flag starts flashing. � Disc will start playback automatically. 4 Press � to stop recording.
DIGITAL SOUND CONTROL
PROGRAM RECORD DUBBING A.REPLAY
SEARCH
STOP� CLEAR PLAY� PAUSE PREV DIM
CK
TE
C
O P
O
MICROPHONE - LEVEL
PBC
View Clock
You can view the clock (if it is set) if the system is in Standby mode or when any sound source is selected (VCD, TUNER, etc.). The clock will be displayed for about seven seconds. � Press CLOCK�TIMER briefly. � "10:38 PM or 22:38" (the current time in either 12- or 24-hour mode) will be displayed depending on whether you have selected 12- or 24-hour mode. � "--:--" will be displayed if the clock is not set.
Clock Setting
The clock can be set in either 12- or 24hour mode, e.g. "12:00 AM" or "00:00". Before setting the clock, you must be in the View Clock mode. 1 Press CLOCK�TIMER to select clock mode. 2 Press PROGRAM to select 12- and 24hour mode. � If 12-hour mode is selected, "12:00" starts flashing and the AM lights up. � If 24-hour mode is selected, "00:00" starts flashing. 3 Set the hour with à or á on the system. 4 Set the minute with à or ë on the system.
Notes: � At the end of side A, flip the tapes to side B and repeat the procedure. � Dubbing of tapes is only possible from tape deck 1 to tape deck 2. � To ensure good dubbing, use tapes of the same length. � You can listen to other source while dubbing.
22
Untitled-1
22
D B B
31/05/2001, 11:35 AM
v
v v
English
Recording
1 Load a blank tape into tape deck 2 and a disc into a disc tray. 2 Press VCD to select VCD/CD mode. � You can program the tracks in the order you want them to be recorded (see Programming Tracks). If not, select the disc by pressing VCD (CD 1�2�3) and
STANDBY-ON
Dubbing tapes (from tape deck 1 to tape deck 2) 1 Press TAPE ( TAPE 1�2 ) to select tape deck 2. 2 Load the prerecorded tape into tape
VCD PAL/NTSC
CD1 � 2 � 3
TUNER
TUNING
v v
BAND
TAPE 1 � 2 TAPE
VIDEO AUX
PRESET
v
Z Z
NEXT
R
RETURN CLOCK�TIMER
VOLUME
3139 116 20021
|
|
|
> |
|