|
|
|
Categories
|
|
Information
|
|
Featured Product
|
|
|
 |
|
|
There are currently no product reviews.
 ;
Manual was complete and available promptly, since I had lost my original manual. Very good response.
;
Whilst this is a photo copy, and some of the pages are a little askew, it was all readable and intact. A real bonus finding an old manual for a classic piece of kit that no other site had.
Great stuff.
;
excellent quality, contains circuits and scan quality, 110 pages
;
It was easy done, and I got exactly what I was looking for.
;
The manuel was exactly what I needed and I received it promptly. Thanks
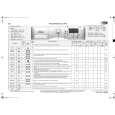
OVEN ACCESSORIES
Accessories supplied depend on the model. The accessories provided with the oven are listed in the Product Description Sheet provided separately (under Accessories).
Drip tray (1)
The drip tray is designed to collect fat and food particles when it is positioned under the grid or as a plate, such as when cooking meat, chicken and fish with or without vegetables. Pour a little water into the drip tray to prevent spatters of fat and smoke.
1
Baking tray (2)
For cooking biscuits, cakes and pizzas.
2
Grid (3)
The grid can be used to grill food or as a support for baking trays, cake tins and other cooking receptacles. It can be placed on any of the runners in the ovens. The grid can be inserted with its curved side facing upwards or downwards.
3
Grid (3a) for Australia only
The grid rear tray guard must be positioned up-right and to the rear of the oven. Follow the arrow indication when inserting in the oven.
3a Side catalytic panels (4)
The catalytic panels have a special microporous enamel coating that absorbs fat spatters. We recommend an automatic cleaning cycle after cooking particularly fatty food (see �Care and Maintenance�).
Meat tray (5)
Position the meat tray above the drip tray with the opening positioned towards the door. Pour some water on the drip tray which can be used from time to time to pour on the meat.
4
5 Kit �Grill Pan Set� (6)
The set comprises a grid (6a), an enamel drip tray (6b) and one handle (6c). This set must be placed on the grid (3) and used with the Grill function.
6c 6a
6b
6
7
|
|
|
> |
|