|
|
|
Categories
|
|
Information
|
|
Featured Product
|
|
|
 |
|
|
There are currently no product reviews.
 ;
Genuine Toshiba owner's manual. Couldn't really ask for more. And written in understandable English in contrast to a few recent experiences I have had with manuals for other equipment other than Toshiba but made in China and written in "Chinglish"!
;
I purchased a vintage Sony mixer off eBay and within the hour was able to locate and purchase the manual for it.I mean really,where else can you find a manual for a product made in 1983!? It was easy to find and purchase/download the manual I needed.I will use this site again for other equipment I have! Great site!
;
manual de usuario perfecto y completo de buena calidad de impresion y muy detallado ideal !
 ;
It`s full copy of a service manual from url http://www.philips.owner-manuals.com/PM3216-service-manual-PHILIPS.html
;
perfect! you just sent to me the copy in Italian witout even my specification!!!! so you are really smart cooperative and efficient. To my opinion the best place all over to get a manual of electronics!!!!
54283agb.fm5 Page 4 Tuesday, March 15, 2005 1:16 PM
INSTALLATION
Technical information for the installer
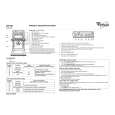
� After removing the oven from its packaging, before making the connections place it on the polystyrene foam base to protect it from damage. Do not attempt to lift the oven by the handle. Lift at the sides as shown in the figure (see arrow). Check that the appliance has not been damaged in transit. Oven dimensions and kitchen unit dimensions are shown in the figure opposite. Kitchen units in contact with the oven must be heat resistant (80° C min). If plastic laminates or cement are not sufficiently heat-resistant, warping, bubbling or detachment of the finish may result. Install the oven in the housing, lifting it at the sides, taking care not to trap the wires of the electrical supply cable. For correct ventilation, follow the ventilation opening directions shown in the figure (500 min x 80 mm and 500 min x 50 mm inside the cabinet). Secure the oven to the kitchen unit with screws (A) as shown.
� � � � �
�
�
�
During oven installation, care must be taken to ensure that the sides are not touching the front edges of the housing or adjacent drawers and doors (see picture).
4
|
|
|
> |
|