|
There are currently no product reviews.
 ;
High quality scan of the manual, very quick and easy download and very important, a truly honest price. thanks
 ;
Minden rendben, de két megjegyzés, az ábrák nehezen kivehetők és a fizetés után 24 órát kell várni a letöltésre.
;
Manual correct, and complete. Downloads cleanly. Format of manual was presumably difficult to PDF to A4, but works reasonably well.
;
This was a hard to find manual. When I did find it , some sites wanted way too much for the file.
Owner-manual .com had it for a really reasonable price. Not only that but it was sent very quickly and was a quality scanned document, unlike some others I purchased from a different site.
Good job guys!!
Larry
;
Fast and courteous service. Product delivered as described. Thank you.
54283agb.fm5 Page 4 Tuesday, March 15, 2005 1:16 PM
INSTALLATION
Technical information for the installer
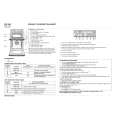
� After removing the oven from its packaging, before making the connections place it on the polystyrene foam base to protect it from damage. Do not attempt to lift the oven by the handle. Lift at the sides as shown in the figure (see arrow). Check that the appliance has not been damaged in transit. Oven dimensions and kitchen unit dimensions are shown in the figure opposite. Kitchen units in contact with the oven must be heat resistant (80° C min). If plastic laminates or cement are not sufficiently heat-resistant, warping, bubbling or detachment of the finish may result. Install the oven in the housing, lifting it at the sides, taking care not to trap the wires of the electrical supply cable. For correct ventilation, follow the ventilation opening directions shown in the figure (500 min x 80 mm and 500 min x 50 mm inside the cabinet). Secure the oven to the kitchen unit with screws (A) as shown.
� � � � �
�
�
�
During oven installation, care must be taken to ensure that the sides are not touching the front edges of the housing or adjacent drawers and doors (see picture).
4
|