|
|
|
Categories
|
|
Information
|
|
Featured Product
|
|
|
 |
|
|
There are currently no product reviews.
 ;
High quality scan of the manual, very quick and easy download and very important, a truly honest price. thanks
 ;
Minden rendben, de két megjegyzés, az ábrák nehezen kivehetők és a fizetés után 24 órát kell várni a letöltésre.
;
Manual correct, and complete. Downloads cleanly. Format of manual was presumably difficult to PDF to A4, but works reasonably well.
;
This was a hard to find manual. When I did find it , some sites wanted way too much for the file.
Owner-manual .com had it for a really reasonable price. Not only that but it was sent very quickly and was a quality scanned document, unlike some others I purchased from a different site.
Good job guys!!
Larry
;
Fast and courteous service. Product delivered as described. Thank you.
NOTE: Do not allow items to hang over the edge of the rack.
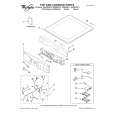
DRYER CARE
Cleaning the Dryer Location
Keep dryer area clear and free from items that would obstruct the flow of combustion and ventilation air.
4. Close the door. 5. Select a timed drying cycle and temperature, or an air cycle (see following chart). Items containing foam, rubber, or plastic must be dried on a clothesline or by using the Air Only temperature setting. 6. You must select a time by pressing MORE TIME or LESS TIME. Reset time as needed to complete drying. Refer to the following table. 7. Press (and hold) HOLD TO START button (about 1 second). NOTE: You must remove rack for normal tumbling. Do not use automatic cycles with the drying rack. This chart shows examples of items that can be rack dried and the suggested cycle, temperature setting and drying time. Actual drying time will depend on the amount of moisture items hold. Rack Dry Wool Sweaters Block to shape and lay flat on the rack Stuffed toys or pillows Cotton or polyester fiber filled Stuffed toys or pillows Foam rubber filled Sneakers or canvas shoes Setting Timed Dry Temp. Low Time* 60
Explosion Hazard Keep flammable materials and vapors, such as gasoline, away from dryer. Place dryer at least 18 inches (46 cm) above the floor for a garage installation. Failure to do so can result in death, explosion, or fire.
Timed Dry N/A
Low
60
Cleaning the Lint Screen
Every load cleaning
The lint screen is located in the door opening of the dryer. Clean it before or after each load. A screen blocked by lint can increase drying time. To clean 1. Pull the lint screen straight up. Roll lint off the screen with your fingers. Do not rinse or wash screen to remove lint. Wet lint is hard to remove.
Air Only (no heat) Air Only (no heat)
90
N/A
90
*(Minutes) Reset time to complete drying, if needed.
2. Push the lint screen firmly back into place. IMPORTANT: s Do not run the dryer with the lint screen loose, damaged, blocked, or missing. Doing so can cause overheating and damage to both the dryer and fabrics.
s
Some towels made of synthetic fibers and natural fibers (polyester and cotton blends) may shed more lint than other towels, causing your dryer�s lint screen to fill up faster. Be sure to remove lint from the lint screen before and after drying new towels. If lint falls off the screen into the dryer during removal, check the exhaust hood and remove the lint. See �Venting Requirements.�
s
20
|
|
|
> |
|