|
|
|
Categories
|
|
Information
|
|
Featured Product
|
|
|
 |
|
|
There are currently no product reviews.
 ;
My first manual from Owner-Manuals.com but not the last! I am very satisfied with the easy ordering and promt delivery of a manual I did not find anywhere else.
 ;
This manual is very helpfull to use the Power Supply. All technical information has been available.
For service use the circuit diagrams are very good.
Thanks .
;
Very comprehensive document which is a must-have for any Satellit 2100 owner whose set up is somewhat intricate. Due to the bad quality of the pictures that are rather dark and a bit blurred I gave 4-star feedback.
;
The manual was missing 2 pages but when I presented the problem to the company they made every attempt to get the 2 pages to me, when they couldn't they refunded my money. A very pleasing and easy transaction. The manual they provided was the original, it was concise and to the point. I plan to do business with this company again when should the need arise.
;
The owners manual is very good. all my how to questions were answered in detail.
End of Cycle Signal
The End of Cycle Signal produces an audible sound when the drying cycle is finished. Promptly removing clothes at the end of the cycle reduces wrinkling.
3. Put the wet items on top of the rack. Leave space between the items so air can reach all the surfaces. NOTE: Do not allow items to hang over the edge of the rack.
Press and release the END OF CYCLE SIGNAL to adjust the sound level or turn off the signal. NOTE: When the WRINKLE SHIELD� feature is selected and the End of Cycle Signal is on, an audible sound will be emitted every 5 minutes until the clothes are removed, or the WRINKLE SHIELD� feature is finished.
Drying Rack
The drying rack is useful for drying items you would not necessarily want to tumble dry or that you would normally line dry (for example, sweaters). To use the drying rack Do not remove the lint screen. 1. Open dryer door.
4. Close the door. 5. Select a timed drying cycle and temperature, or an air cycle (see following chart). Items containing foam, rubber, or plastic must be dried on a clothesline or by using the Air Only temperature setting. 6. You must select a time by pressing MORE TIME or LESS TIME. Reset time as needed to complete drying. Refer to the following table. 7. Press (and hold) HOLD TO START button (about 1 second). NOTE: You must remove rack for normal tumbling. Do not use automatic cycles with the drying rack. This chart shows examples of items that can be rack dried and the suggested cycle, temperature setting and drying time. Actual drying time will depend on the amount of moisture items hold. Rack Dry Wool Sweaters Block to shape and lay flat on the rack. Stuffed toys or pillows Cotton or polyester fiber filled Stuffed toys or pillows Setting Timed Dry Timed Dry N/A Temp. Low Time* 60
Low Air Only (no heat)
60 90
A
A. Front edge
Foam rubber filled Sneakers or canvas shoes N/A
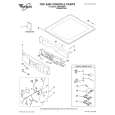
2. Place drying rack inside dryer drum, positioning the back wire on the ledge of the inner dryer back panel. Push down on front edge of drying rack to secure over the lint screen.
Air Only (no heat)
90
*(Minutes) Reset time to complete drying, if needed.
B
A
A. Dryer rack front edge B. Dryer back panel
22
|
|
|
> |
|