|
|
|
Categories
|
|
Information
|
|
Featured Product
|
|
|
 |
|
|
There are currently no product reviews.
 ;
Manual was complete and available promptly, since I had lost my original manual. Very good response.
;
Whilst this is a photo copy, and some of the pages are a little askew, it was all readable and intact. A real bonus finding an old manual for a classic piece of kit that no other site had.
Great stuff.
;
excellent quality, contains circuits and scan quality, 110 pages
;
It was easy done, and I got exactly what I was looking for.
;
The manuel was exactly what I needed and I received it promptly. Thanks
This chart shows examples of items that can be rack dried. After selecting the Rack Dry cycle, select the temperature setting and drying time across from each item. Rack Dry Wool Sweaters Block to shape and lay flat on the rack Stuffed toys or pillows Cotton or polyester fiber filled Stuffed toys or pillows Foam rubber filled Sneakers or canvas shoes Temp Time*
To wash
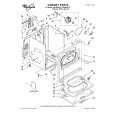
1. Wet both sides of lint screen with hot water. 2. Wet a nylon brush with hot water and liquid detergent. Scrub lint screen with the brush to remove residue buildup.
Low
60
Low
60
3. Rinse screen with hot water. 4. Thoroughly dry lint screen with a clean towel. Replace screen in dryer.
Air Only Air Only
90 90
Cleaning the Dryer Interior
*(Minutes) Reset cycle to complete drying, if needed. (Drying time will depend on amount of moisture items hold). NOTE: If your model does not have a drying rack you can order one by calling 1-800-253-1301 or by contacting the dealer from whom you bought your appliance.
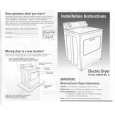
CARING FOR YOUR DRYER
Explosion Hazard
Cleaning the Lint Screen
Every load cleaning
The lint screen is located on the top of the dryer. Clean it before each load. A screen blocked by lint can increase drying time. To clean 1. Pull the lint screen towards you. Roll lint off the screen with your fingers. Do not rinse or wash screen to remove lint. Wet lint is hard to remove.
Use nonflammable cleaner. Failure to do so can result in death, explosion, or fire.
To clean dryer drum
1. Make a paste with powdered laundry detergent and very warm water. 2. Apply paste to a soft cloth. OR Apply a liquid, non-flammable household cleaner to the stained area and rub with a soft cloth until all excess dye is removed. 3. Wipe drum thoroughly with a damp cloth. 4. Tumble a load of clean cloths or towels to dry drum. NOTE: Garments which contain unstable dyes, such as denim blue jeans or brightly colored cotton items, may discolor the dryer interior. These stains are not harmful to your dryer and will not stain future loads of clothes. Dry unstable dye items inside out to prevent dye transfer.
2. Push the lint screen firmly back into place. IMPORTANT: Do not run the dryer with the lint screen loose, damaged, s blocked, or missing. Doing so can cause overheating and damage to both the dryer and fabrics.
s
Some towels made of synthetic fibers and natural fibers (polyester and cotton blends) may shed more lint than other towels, causing your dryer�s lint screen to fill up faster. Be sure to remove lint from the lint screen before and after drying new towels. If lint falls off the screen into the dryer during removal, check the exhaust hood and remove the lint. See �Checking Your Vent.�
s
As needed cleaning
Laundry detergent and fabric softener residue can buildup on the lint screen. This buildup can cause longer drying times for your clothes, or cause the dryer to stop before your load is completely dry. The screen is probably clogged if lint falls off the screen. Clean the lint screen with a nylon brush every six months or more frequently if it becomes clogged due to a residue buildup.
11
|
|
|
> |
|