|
|
|
Categories
|
|
Information
|
|
Featured Product
|
|
|
 |
|
|
There are currently no product reviews.
 ;
I AM HIGHLY IMPRESSED BY THE EASE OF USE OF THIS DOWNLOAD SERVICE. INSTRUCTIONS ARE CLEAR AND SIMPLE TO FOLLOW....EVEN BY TECHNOPHOBES SUCH AS MYSELF. THE EMAILS POINT YOU IN THE RIGHT DIRECTION...ITS SO EASY PEASY. THE DOWNLOAD CHOICE OF USER MANUALS IS EXTENSIVE AND I COULD NOT FIND A CHEAPER OR MORE EFFICIENT SERVICE ON THE INTERNET. I COULD NOT HAVE MADE A BETTER CHOICE OF INFORMATION PROVIDER. SHOULD I EVER NEED ANOTHER USER MANUAL, THEN THIS IS THE FIRST CHOICE SITE. COULD NOT BE BETTER PLEASED!!!!!!!...MANY THANXES FROM JIM BURNS
;
I was impressed with the quality of service (frequent e-mails to let you know the status of your order), and the speed at which the download became available. The manual was a life saver and was not easy to track down. Thank you for such an excellent service.
;
the manual was just what i wanted it had all the revelent information required to operate the hifi .Iwould use any manual i downloaded for any item which needs a manual
;
Die gewünschte Bedienungsanleitung wurde vereinbarungsgemäß in deutsch bereitgestellt. Sie ist gut lesbar. Kein Kauderwelsch.
Danke für den Service.
;
GOOD SERVICE MANUAL GOT ALL THE INFO. THAT I NEEDED..
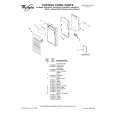
Turntable
1
Designed Cooking Rack
The cooking rack is ideal for two-level cooking. It provides ex tra cavity space for cooking two or more containers at the same time. Insert the rack securely into the rack supports on the side walls of the oven. See �Assistance or Service� section to reorder rack.
2 3 4
1. Turntable 2. Hub 3. Support 4. Shaft
1
1. Proper Use
s
The turntable rotates in both directions to help cook food more evenly. Do not operate the microwave oven without the turntable in place. See �Assistance or Service� to reorder any of the parts.
Rack will become hot. Always use oven mitts or pot holders when handling. Do not allow the rack to touch the inside cavity walls, ceiling or floor. Do not use metal cookware, utensils, or a browning dish with the rack. Do not let food container on rack touch the top or sides of the oven. Do not place popcorn bags on rack. The rack is designed specifically for this oven. Do not use it in any other oven. Do not cook food directly on the rack. Always use a microwave-safe container. Only use the rack when cooking on two levels. Do not store it in the oven. Damage to the oven could result if someone accidentally turns on the oven.
s
s
To Install:
1. Remove tape from the hub. 2. Place the support on the oven cavity bottom. 3. Place the turntable on the support. Fit the raised, curved lines in the center of the turntable bottom between the three spokes of the hub. The rollers on the support should fit inside the turntable bottom ridge.
s s
s s
To Turn Off:
The turntable can be turned off (ex cept during an auto function). This is helpful when cooking with plates that are larger than the turntable or when cooking with two 10 in. (25 cm) plates that are side-by-side. 1. Touch TURNTABLE ON/OFF. �TURNTABLE OFF� will appear in the display. Display will prompt you to enter cook time. 2. Touch number pads to enter length of time to cook. 3. Touch START/ENTER (or START). For optimal results, halfway through cook time turn plate(s) so the food in the front is in the back. 4. Touch OFF/CANCEL (or CANCEL/OFF) or open the door to clear the display and/or stop reminder tones. Turntable will be turned back on.
s
6
|
|
|
> |
|