|
|
|
Categories
|
|
Information
|
|
Featured Product
|
|
|
 |
|
|
There are currently no product reviews.
 ;
I purchased the unit from a private party and the original owners manual was not available. Having the ability to download it was extremely helpful and clarified operating the equipment immensely. This is a complicated unit and without the manual I would not have been able to maximize it's potential. Thank you.
;
Being a user of older radios of many kinds, preferring them over more modern rigs, this manual was invaluable in the programming of my two. I now know for certain what the assorted buttons functions are, and am very grateful to have found this excellent site. Many thanks for your assistance, Tony.
 ;
Clear and easy to read. All details as expected. Price acceptable , and quick delivery.
;
Quick response and exactly what I was looking for and at a great fair price!
;
5 star quality on these downloadable manuals. Easy to read and all the information is there. A must when doing a custom install or needing to service your precious old school electronics.
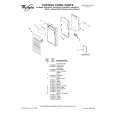
Turntable
1
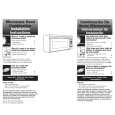
Designed Cooking Rack
The cooking rack is ideal for two-level cooking. It provides ex tra cavity space for cooking two or more containers at the same time. Insert the rack securely into the rack supports on the side walls of the oven. See �Assistance or Service� section to reorder rack.
2 3 4
1. Turntable 2. Hub 3. Support 4. Shaft
1
1. Proper Use
s
The turntable rotates in both directions to help cook food more evenly. Do not operate the microwave oven without the turntable in place. See �Assistance or Service� to reorder any of the parts.
Rack will become hot. Always use oven mitts or pot holders when handling. Do not allow the rack to touch the inside cavity walls, ceiling or floor. Do not use metal cookware, utensils, or a browning dish with the rack. Do not let food container on rack touch the top or sides of the oven. Do not place popcorn bags on rack. The rack is designed specifically for this oven. Do not use it in any other oven. Do not cook food directly on the rack. Always use a microwave-safe container. Only use the rack when cooking on two levels. Do not store it in the oven. Damage to the oven could result if someone accidentally turns on the oven.
s
s
To Install:
1. Remove tape from the hub. 2. Place the support on the oven cavity bottom. 3. Place the turntable on the support. Fit the raised, curved lines in the center of the turntable bottom between the three spokes of the hub. The rollers on the support should fit inside the turntable bottom ridge.
s s
s s
To Turn Off:
The turntable can be turned off (ex cept during an auto function). This is helpful when cooking with plates that are larger than the turntable or when cooking with two 10 in. (25 cm) plates that are side-by-side. 1. Touch TURNTABLE ON/OFF. �TURNTABLE OFF� will appear in the display. Display will prompt you to enter cook time. 2. Touch number pads to enter length of time to cook. 3. Touch START/ENTER (or START). For optimal results, halfway through cook time turn plate(s) so the food in the front is in the back. 4. Touch OFF/CANCEL (or CANCEL/OFF) or open the door to clear the display and/or stop reminder tones. Turntable will be turned back on.
s
6
|
|
|
> |
|