|
|
|
Categories
|
|
Information
|
|
Featured Product
|
|
|
 |
|
|
There are currently no product reviews.
 ;
Sono molto soddisfatto e, quando mi necessiterà, mi avvarrò nuovamente di questo servizio!
;
A comprehensive Operating and Service Manual. All schematics are complete and easy to read. The PCB drawings and complete parts list are very helpful. I would definitely recommend this manual.
;
SCANNING OF HIGH QUALITY
VERY, VERY HIGH VELOCITY DOWNLOAD
VERY GOOD PRICE,
TRUE SATISFIED, THANKS
;
Genuine Toshiba owner's manual. Couldn't really ask for more. And written in understandable English in contrast to a few recent experiences I have had with manuals for other equipment other than Toshiba but made in China and written in "Chinglish"!
;
I purchased a vintage Sony mixer off eBay and within the hour was able to locate and purchase the manual for it.I mean really,where else can you find a manual for a product made in 1983!? It was easy to find and purchase/download the manual I needed.I will use this site again for other equipment I have! Great site!
STEAMER VESSEL
â� â�
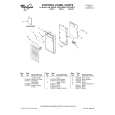
3. Remove charcoal filters by pushing the back of each filter away from you until the front of the filter slides off the front lower lip. Swing the front of the filter down and slide out.
Soft brush, if necessary, to clean holes. Dishwasher: The steamer vessel is dishwasher safe. Stubborn Stains To remove stains such as tomato sauce, use a nonabrasive cleanser, a no-scratch pad, or a solution of dishwasher detergent and water (¼ cup [60 mL] detergent to 1 cup [250 mL] warm water).
TURNTABLE
Replace turntable immediately after cleaning. Do not operate the microwave oven without the turntable in place. â� Mild cleanser and scouring pad
â�
1 2 3
1. Upper lip 2. Spring 3. Lower lip
Dishwasher
To Replace:
Replacing Filters
The grease filters should be removed and cleaned at least once a month. The charcoal filters cannot be washed and should be replaced every 6 to 12 months. Do not operate the microwave oven without the filters in place. See �Assistance or Service� to reorder filters. See �General Cleaning� for cleaning instructions.
1. Replace charcoal filters by positioning the filter at the back of the opening and resting it on the springs. While pushing the filter into the springs, position the front of filter between the front upper and lower lips. 2. Replace grease filters by inserting one end into the frame. Swing other side up and slide into position. 3. Plug in microwave oven or reconnect power.
To Remove:
1. Unplug microwave oven or disconnect power. 2. Remove the grease filters by pushing up and sliding to the side. Pull tab down until the filter drops out.
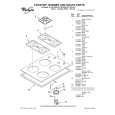
Replacing Cooktop Light
The cooktop light is a candelabra base 30-watt bulb. See �Assistance or Service� section to reorder.
To Replace:
1
1. Unplug microwave oven or disconnect power. 2. Remove the bulb cover mounting screw.
1
1. Tabs
1. Mounting screw
3. Replace light. Close bulb cover. Replace mounting screw. 4. Plug in microwave oven or reconnect power.
15
|
|
|
> |
|