|
|
|
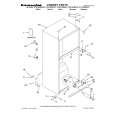
Categories
|
|
Information
|
|
Featured Product
|
|
|
 |
|
|
There are currently no product reviews.
 ;
Delivery came quite promptly and in a very readable format. Thank you.
;
I found my Clarion VRX8370R in the Camper I bought and I wasn't able for month to understand it.
The Owner Manual was perfect and just what I was searching for.
Thank you.
Leonardo
;
Very good copy of Manual, clear and easy to print off, arrived very promptly and reasonably priced.
Thanks, I will use you again.
;
Zeer duidelijke afdrukken op A4-formaat , zeer uitgebreide handleiding . Pluspunt ,zeer snelle
respons van jullie , binnen de 24h . Top !!!
;
I AM HIGHLY IMPRESSED BY THE EASE OF USE OF THIS DOWNLOAD SERVICE. INSTRUCTIONS ARE CLEAR AND SIMPLE TO FOLLOW....EVEN BY TECHNOPHOBES SUCH AS MYSELF. THE EMAILS POINT YOU IN THE RIGHT DIRECTION...ITS SO EASY PEASY. THE DOWNLOAD CHOICE OF USER MANUALS IS EXTENSIVE AND I COULD NOT FIND A CHEAPER OR MORE EFFICIENT SERVICE ON THE INTERNET. I COULD NOT HAVE MADE A BETTER CHOICE OF INFORMATION PROVIDER. SHOULD I EVER NEED ANOTHER USER MANUAL, THEN THIS IS THE FIRST CHOICE SITE. COULD NOT BE BETTER PLEASED!!!!!!!...MANY THANXES FROM JIM BURNS
Section
04
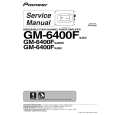
Installation
Before installing the amplifier
WARNING
! To ensure proper installation, use the supplied parts in the manner specified. If any parts other than those supplied are used, they may damage internal parts of the amplifier, or become loose causing the amplifier to shut down. ! Do not install in: � Places where it could injure the driver or passengers if the vehicle stops suddenly. � Places where it may interfere with the driver, such as on the floor in front of the driver�s seat. ! Install tapping screws in such a way that the screw tip does not touch any wire. This is important to prevent wires from being cut by vibration of the car, which can result in fire. ! Make sure that wires are not caught in the sliding mechanism of the seats, resulting in a short-circuit. ! When drilling to install the amplifier, always confirm no parts are behind the panel and protect all cables and important equipment (e.g. fuel/brake lines, wiring) from damage.
! After installing the amplifier, confirm that the spare tire, jack and tools can be easily removed.
Example of installation on the floor mat or chassis
1 Place the amplifier in the desired installation location. Insert the supplied tapping screws (4 mm � 18 mm) into the screw holes and push on the screws with a screwdriver so they make an imprint where the installation holes are to be located. 2 Drill 2.5 mm diameter holes at the imprints either on the carpet or directly on the chassis. 3 Install the amplifier with the use of supplied tapping screws (4 mm � 18 mm).
CAUTION
! To ensure proper heat dissipation of the amplifier, ensure the following during installation: � Allow adequate space above the amplifier for proper ventilation. � Do not cover the amplifier with a floor mat or carpet. ! Avoid routing wires through hot areas, such as near the heater outlet. Heat may damage the insulation, resulting in a short-circuit through the vehicle body. ! The optimal installation location differs depending on the car model. Secure the amplifier at a sufficiently rigid location. ! Firstly make temporary connections and check to ensure the amplifier and system operate properly.
1 Tapping-screws (4 mm � 18 mm) 2 Drill a 2.5 mm diameter hole 3 Floor mat or chassis
12
En
|
|
|
> |
|