|
|
|
Categories
|
|
Information
|
|
Featured Product
|
|
|
 |
|
|
There are currently no product reviews.
 ;
I was very pleased with the manual I got for my amateur (ham) radio. Without it I could not figure out how to input and/or change the P/L setting on my radio. It drove me nuts as the radio was essentially useless. That all changed when my manual came. Then it took only minutes and I was done. Now my radio works fine. This is an exceptionally good resource as it's a very easy and user friendly download. Thank you very much! Dziękujemy za!
 ;
It answered my question, which was how to load the paper. I did notice that the very end of the manual was not visible.
;
The product manual I received was exactly what I was looking for, delivered painlessly at a very fair price. I can't ask for any more than that.
;
Very well done!!!!! congratulations. It was a bit longer than usual the wiating time even if it was on time (in 24 hours).
;
Last week I bought a second hand BAUKNECHT TRK4850 DRYER. It is a professional machine with many programs and switch options. I feared it would be a huge quest to find a manual. I was delighted when I found owner-manuals.com. After payment I received the file to download the next day already. The quality is great. I am very happy. Thanks!
but kindly the distributions of the operating programs not find in the owners manual,can you help me to understand the operating programs instructions thank you
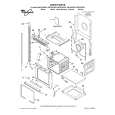
USING YOUR OVEN
To delay start and stop automatically: 1. Place the oven rack(s) where you need them and put your food in the oven.
To place your racks correctly, see �Positioning racks and pans� in �Using the oven� earlier in this section.
6. PRESS
DELAY START TIME
YOU SEE
F
BAKE START TIME
2. PRESS
BAKE
YOU SEE
F
BAKE
7. Set the start time.
Press the �up� (v) or �down� (w) pad(s) until the correct time shows on the display. The following example shows a chosen start time of 2 o�clock. The oven will shut off by itself at 2:30 (the set start time plus the set cook time).
3. Set the temperature (optional).
PRESS
TEMP
BAKE
PRESS
HR MIN
YOU SEE
F
BAKE START TIME
YOU SEE
F
(example shows 2 o�clock start time)
(example shows Bake at 375°F) Do this step if you want to set a temperature other than 350°F. Press v to raise the temperature or w to lower the temperature in 5°F amounts. Use these pads until the temperature you want shows on the small display.
8. PRESS
START
ENTER
YOU SEE
F
DELAY BAKE
4. PRESS
COOK TIME
YOU SEE
F
BAKE COOK TIME
NOTE: You can change the temperature or time settings any time after pressing START/ ENTER by repeating Steps 2 through 7.
9. When the start time is reached:
You will hear a 1-second tone. The display will count down the baking/roasting time in hours and minutes (if the cook time is more than one hour) or in minutes and seconds (if the cook time is less than one hour).
5. Set the cook time.
Press the �up� (s) or �down� (t) pad(s) until the correct time shows on the display.
PRESS
HR MIN
YOU SEE YOU SEE
F
BAKE COOK TIME HEAT BAKE
F
ON
COOK TIME
(example shows 30-minute baking/roasting time)
(display counts down cook time)
16
|
|
|
> |
|