|
|
|
Categories
|
|
Information
|
|
Featured Product
|
|
|
 |
|
|
There are currently no product reviews.
 ;
Product was very good. Received quickly and complete
 ;
The Sony AV-3600 service manual was what I needed for the repair of this unit
Thanks for the good service
Dave
;
I purchased a copy of my old JVC VCR Service manual from Owner-Manuals.com
The copy was complete and valuable to me.
I was able to fix my VCR - it had a bad belt.
I am glad I found Owner-Manuals.com
Great Price. Thanks
;
Great service! I got manual to my sony receiver for very reasonoble price.
;
Good service, well organized. Cheap, and the service manual was as expected. A valuable service for those of us wanting to keep the old junk going!
5
6
7
8
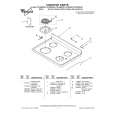
7. GENERAL INFORMATION
7.1 DIAGNOSIS 7.1.1 DISASSEMBLY
- Removing the Case (Fig.1)
A
2
Case
2 2
2
1 2
Remove the screw.
Remove the six screws and then remove the Case.
2
B
2
1
Fig.1 - Removing the Amp PCB (Fig.2)
C
1 2
Remove the six screws.
Remove the screw and then remove the Amp PCB.
1
2 1
D
1 1 1 1
Amp PCB
Fig.2
E
F
GM-D510M/X1R/EW
23 7 8
5
6
|
|
|
> |
|