|
|
|
Categories
|
|
Information
|
|
Featured Product
|
|
|
 |
|
|
There are currently no product reviews.
 ;
I got your link from a friend and I must say that I am really satisfied with your service. Specially this B&O manual I didn't find anywhere on the web... but you could deliver it :-) . You deliver very fast and the copy is of good quality. So your webpage is bookmarked. Thanks
;
This was the Sony CCU-500A Service manual I was looking for.
The price was reasonable.
The permission to download was quck.
I will use Owner-Manual.com for all my manual needs.
;
Excellent printing quality.
A complete and very usefull service manual with all details.
GREAT SERVICE AT VERY LOW PRICE!
A+++++++++++++++++++++++++
;
Excellent printing quality.
A complete and very usefull service manual with all details.
GREAT SERVICE AT VERY LOW PRICE!
A+++++++++++++++++++++++++
;
Excellent printing quality.
A complete and very usefull service manual with all details.
GREAT SERVICE AT VERY LOW PRICE!
A+++++++++++++++++++++++++
GM-X422, GM-X322
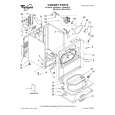
7. GENERAL INFORMATION
7.1 DISASSEMBLY
A
- Removing the Case and Panel
1. Remove six screws A, and then remove case. 2. Remove panel.
A
Panel
Case
Fig. 6
- Removing the Amp Unit
B C
Sub Heat Sink
Some silicone glue has been applied between the Heat sink and the Sub Heat Sink. therefore, to remove the Amp Unit from the Heat Sink. 1. Remove four screws B and Three screws C. 2. Use 2 pcs. of screw B and insert them into the two holes marked with an arrow. 3. Alternately tighten them little by little until the Sub Heat Sink separates from the Heat Sink.
C
B
Sub Heat Sink Amp Unit Heat Sink Fig. 7
15
|
|
|
> |
|