|
|
|
Categories
|
|
Information
|
|
Featured Product
|
|
|
 |
|
|
There are currently no product reviews.
 ;
Very nice and real Service Manual, I didn't thought it actually exist in the real world at all.
 ;
VERY NICE FOR COURTESY AND PRECISION!.
tHE SITE IS VERY IMPORTANT FOR ALL DEVICES
vERY GOOD
;
+++ Is is fine, that was what i looking for. Thanks! +++
;
A very good complete archive, i am very satisfied for document.
;
The Service Manual received was helpful. The electronic information is exactly what I needed.
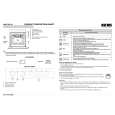
FO-71TH/UX-61TH/GQ-56TH/FO-51TH UX-41TH/GQ-31TH/UX-21TH/FO-11TH/GQ-11TH 3. Connecting the power cord
prong) outlet.
1Plug the power cord into a 220 - 240 V, 50/60 Hz, earthed AC (2� When disconnecting the fax, unplug the telephone line cord before
unplugging the power cord. � Caution: Do not plug the power cord into any other kind of outlet. This will damage the machine and is not covered under the warranty.
5. Moving your fax and reconnecting
If it is necessary to move your fax to a new location, first disconnect the telephone line cord before disconnecting the power cord. When reconnecting, it is necessary to connect the power cord before connecting the telephone line cord.
6. Attaching the original document support
Attach the original document support as shown below.
� The machine does not have a power on/off switch, so the power is
turned on and off by simply plugging in or unplugging the power cord.
3. Loading the thermal paper (FO-20PR)
� Your fax machine prints incoming faxes on a special kind of paper called fax paper. The fax machine�s print head creates text and images by applying heat to the thermal paper.
4. Connecting the telephone line cord
�
1Insert one end of the line cord into the socket on the back of the
machine marked TEL. LINE. Insert the other end into a wall telephone socket.
1 Grasp the finger hold as shown and pull up to open the operation
panel.
TEL SE . T T EL LINE .
Dial mode: The fax machine is set for tone dialing. If you are on a pulse dial line, you must set the fax machine for pulse dialing. Press the keys on the operation panel as follows:
Display:
2 Flip up the front paper guide.
FO-51/11 UX-41/21 GQ-31/11 FO-71 UX-61 GQ-56 Press the knob to mark sure the front side of the metal guide is down.
1. Press 2. Press
FUNCTION
once and
4
once.
OPTION SETTING DIAL MODE
4 times.
3. Select the dial mode: TONE: 1 PULSE: 2
STOP
3 If you are loading paper that is 210 mm in width, place the paper roll
shims on each side of the paper compartment. (Note that Sharp recommended paper, including the initial roll, is 216 mm in width.) � The ribbed side of the shims should face in (toward each other).
4. Press
to exit.
1�5
|
|
|
> |
|