|
|
|
Categories
|
|
Information
|
|
Featured Product
|
|
|
 |
|
|
There are currently no product reviews.
 ;
The manual was made available promptly. I is a clean scan of the original. I had no problem downloading it. The scan was well centered and cleanly formatted. It is as good a product as can be had without being the original document.
 ;
Received downlink in less then 8 hours, Item was in good copy condition, and told me how to program the clock timer. The price was very resonable, and the process was very automated and was GREAT to work with.
;
Fast service, document is OK. Thanks! Searched for it long time.
;
I was very pleased with the manual I got for my amateur (ham) radio. Without it I could not figure out how to input and/or change the P/L setting on my radio. It drove me nuts as the radio was essentially useless. That all changed when my manual came. Then it took only minutes and I was done. Now my radio works fine. This is an exceptionally good resource as it's a very easy and user friendly download. Thank you very much! Dziękujemy za!
;
It answered my question, which was how to load the paper. I did notice that the very end of the manual was not visible.
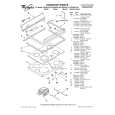
Metal marks from aluminum and copper s Cooktop Polishing Creme: Clean as soon as cooktop has cooled down. Rub creme into surface with a damp paper towel or soft cloth. Continue rubbing until white film disappears. The marks will not totally disappear but after many cleanings become less noticeable. Tiny scratches and abrasions s Cooktop Polishing Creme: Rub creme into surface with a damp paper towel or soft cloth. Continue rubbing until white film disappears. Scratches and abrasions do not affect cooking performance and after many cleanings become less noticeable.
Oven Light
The oven light is a standard 40-watt appliance bulb. It will come on when the oven door is open. It will not work during the SelfCleaning cycle. On some models, when the oven door is closed, press OVEN LIGHT to turn it on or off. Before replacing, make sure the oven and cooktop are cool and the control knobs are in the off position. To replace: 1. Unplug range or disconnect power. 2. Turn the glass bulb cover in the back of the oven counterclockwise to remove.
COOKTOP CONTROLS
Do not use steel wool, abrasive cleansers or oven cleaner. Do not soak knobs. When replacing knobs, make sure knobs are in the Off position. On some models, do not remove seals under knobs. s Soap and water or dishwasher: Pull knobs straight away from control panel to remove.
OVEN DOOR EXTERIOR
s
3. Turn bulb counterclockwise to remove from socket. 4. Replace bulb and bulb cover by turning clockwise. 5. Plug in range or reconnect power.
Glass cleaner and paper towels or nonabrasive plastic scrubbing pad: Apply glass cleaner to soft cloth or sponge, not directly on panel.
Oven Door
For normal range use, it is not suggested to remove the oven door. However, if removal is necessary, make sure the oven is off and cool. Then, follow these instructions. The oven door is heavy.
CONTROL PANEL
Do not use abrasive cleaners, steel-wool pads, gritty washcloths or some paper towels. Damage may occur. s Glass cleaner and soft cloth or sponge: Apply glass cleaner to soft cloth or sponge, not directly on panel.
To Remove:
1. Fully open the oven door. 2. Unscrew clips with a #2 square or Phillips screwdriver.
OVEN CAVITY
Do not use oven cleaners. Food spills should be cleaned when oven cools. At high temperatures, foods react with porcelain and staining, etching, pitting or faint white spots can result. s Self-Cleaning cycle: See �Self-Cleaning Cycle� first.
OVEN RACKS AND ROASTING RACKS
s
Self-Cleaning cycle: See �Self-Cleaning Cycle� first. Remove racks or they will discolor and become harder to slide. If this happens, a light coating of vegetable oil applied to the rack guides will help them slide. Steel-wool pad
3. Close oven door to the stop position (open about 4 in. [10 cm]). 4. Lift door slightly and pull out and back until hinges come out to the catch position. 5. Push door down and pull straight out to remove door completely.
4" (10 cm)
4"
s
BROILER PAN AND GRID
Do not clean in the Self-Cleaning cycle (on some models). s Mildly abrasive cleanser: Scrub with wet scouring pad.
s
Solution of ¹ � cup (125 mL) ammonia to 1 gal. (3.75 L) water: Soak for 20 minutes, then scrub with scouring or steel-wool pad. Oven cleaner: Follow product label instructions.
s
Porcelain enamel only, not chrome s Dishwasher
17
|
|
|
> |
|