|
|
|
Categories
|
|
Information
|
|
Featured Product
|
|
|
 |
|
|
There are currently no product reviews.
 ;
perfect! you just sent to me the copy in Italian witout even my specification!!!! so you are really smart cooperative and efficient. To my opinion the best place all over to get a manual of electronics!!!!
;
Well Well Well!!!! Good manual perfect for my hobby!!! As Before you have done a very well done work!!!! Thank you
;
Super nice! Good to have a manual in digital format.
;
Great job supplying the manual.
Many of these products weerepretty obscure, so it was great that you had
the manual for it!
;
Great manual, would not have been able to operate my machine without it!!
James Dawson August 18, 2012
EDITING
EN
33
Dubbing To Or From A Video Unit Equipped With A DV Connector (Digital Dubbing)
It is also possible to copy recorded scenes from the camcorder onto another video unit equipped with a DV connector. Since a digital signal is sent, there is little, if any, image or sound deterioration.
� It is recommended to use the AC Adapter as the power supply instead of the battery pack. ( pg. 13) � If a blank portion or disturbed image is played back on the player during dubbing, the dubbing may stop so that an unusual image is not dubbed. � Even though the DV cable is connected correctly, sometimes the image may not appear in step 4. If this occurs, turn off the power and make connections again. � When using a DV cable, be sure to use the optional JVC VC-VDV204U DV cable.
NOTES:
To use this camcorder as a recorder
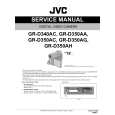
1 Make sure all units are turned off. 2 Connect this camcorder to a video unit
equipped with a DV output connector using a DV cable as shown in the illustration.
To DV IN/OUT
3 Set the camcorder�s Power Switch to �PLAY�. 4 Set �REC MODE� to �SP� or �LP�. ( pg. 25) 5 Press the Recording Start/Stop Button to
� The � DV IN � indication appears on the screen.
engage the Record-Pause mode.
Core �lter
DV cable (optional)
6 Start playback on the player. 7 At the point you want to start dubbing, press
the Recording Start/Stop Button to start dubbing. The indication rotates. to stop dubbing. The rotating. mode.
8 Press the Recording Start/Stop Button again
indication stops
To DV IN/OUT
9 Press 7 to return to the normal playback
NOTE:
Digital Dubbing is performed in the sound mode recorded on the original tape, regardless of the current �SOUND MODE� setting. ( pg. 23)
Video unit equipped with DV connector
To use this camcorder as a player
1 Make sure all units are turned off. 2 Connect this camcorder to a video unit
equipped with a DV input connector using a DV cable as shown in the illustration.
3 Start playback on the camcorder. ( pg. 20) 4 At the point you want to start dubbing, start
recording on the video unit. (Refer to the video unit�s instruction manual.)
5 To stop dubbing, stop recording on the video unit, then stop playback on this camcorder.
ADVANCED FEATURES
|
|
|
> |
|