|
|
|
Categories
|
|
Information
|
|
Featured Product
|
|
|
 |
|
|
There are currently no product reviews.
 ;
Genuine Toshiba owner's manual. Couldn't really ask for more. And written in understandable English in contrast to a few recent experiences I have had with manuals for other equipment other than Toshiba but made in China and written in "Chinglish"!
;
I purchased a vintage Sony mixer off eBay and within the hour was able to locate and purchase the manual for it.I mean really,where else can you find a manual for a product made in 1983!? It was easy to find and purchase/download the manual I needed.I will use this site again for other equipment I have! Great site!
;
manual de usuario perfecto y completo de buena calidad de impresion y muy detallado ideal !
 ;
It`s full copy of a service manual from url http://www.philips.owner-manuals.com/PM3216-service-manual-PHILIPS.html
;
perfect! you just sent to me the copy in Italian witout even my specification!!!! so you are really smart cooperative and efficient. To my opinion the best place all over to get a manual of electronics!!!!
EDITING
EN
33
Dubbing To Or From A Video Unit Equipped With A DV Connector (Digital Dubbing)
It is also possible to copy recorded scenes from the camcorder onto another video unit equipped with a DV connector. Since a digital signal is sent, there is little, if any, image or sound deterioration.
� It is recommended to use the AC Adapter as the power supply instead of the battery pack. ( pg. 13) � If a blank portion or disturbed image is played back on the player during dubbing, the dubbing may stop so that an unusual image is not dubbed. � Even though the DV cable is connected correctly, sometimes the image may not appear in step 4. If this occurs, turn off the power and make connections again. � When using a DV cable, be sure to use the optional JVC VC-VDV204U DV cable.
NOTES:
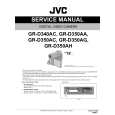
To use this camcorder as a recorder
1 Make sure all units are turned off. 2 Connect this camcorder to a video unit
equipped with a DV output connector using a DV cable as shown in the illustration.
To DV IN/OUT
3 Set the camcorder�s Power Switch to �PLAY�. 4 Set �REC MODE� to �SP� or �LP�. ( pg. 25) 5 Press the Recording Start/Stop Button to
� The � DV IN � indication appears on the screen.
engage the Record-Pause mode.
Core �lter
DV cable (optional)
6 Start playback on the player. 7 At the point you want to start dubbing, press
the Recording Start/Stop Button to start dubbing. The indication rotates. to stop dubbing. The rotating. mode.
8 Press the Recording Start/Stop Button again
indication stops
To DV IN/OUT
9 Press 7 to return to the normal playback
NOTE:
Digital Dubbing is performed in the sound mode recorded on the original tape, regardless of the current �SOUND MODE� setting. ( pg. 23)
Video unit equipped with DV connector
To use this camcorder as a player
1 Make sure all units are turned off. 2 Connect this camcorder to a video unit
equipped with a DV input connector using a DV cable as shown in the illustration.
3 Start playback on the camcorder. ( pg. 20) 4 At the point you want to start dubbing, start
recording on the video unit. (Refer to the video unit�s instruction manual.)
5 To stop dubbing, stop recording on the video unit, then stop playback on this camcorder.
ADVANCED FEATURES
|
|
|
> |
|