|
|
|
Categories
|
|
Information
|
|
Featured Product
|
|
|
 |
|
|
There are currently no product reviews.
 ;
It is perfect, exactly what we needed. It's like the paper version but less clutter.
 ;
Received my manual within 24 hours. Very clear scan of the manual I needed. Thanks!
;
Very clear scan, I recommend it. Definitely a must have for any 3362 owner.
Alpine could have written a slightly more complete manual, though. It's already pretty huge, but the unit has so many functions, I feel some more explanation would have been better.
Yamaha's manual of their comparable YDSP-1 is a little better in my opinion.
;
Immediate response with excellent service - highly reccommended
;
Correct manual received and of good quality but the contents of the file for the Service Manual for the same monitor is for a 20" TV not the RGB Monitor.
MISE EN ROUTE
FR
15
Ajustement de la netteté du viseur
1 Régler l�interrupteur d�alimentation sur �REC�
tout en appuyant sur la touche de verrouillage située sur l�interrupteur.
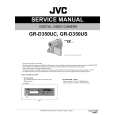
Ajustement de la luminosité de l�af�chage
1 Régler l�interrupteur
d�alimentation sur �REC� ou �PLAY� tout en appuyant sur la touche de verrouillage située sur l�interrupteur. 2 Ouvrir complètement l�écran LCD. ( p. 18)
1 3 2
2 S�assurer que l�écran LCD est fermé et
verrouillé. Tirer complètement sur le viseur et l�ajuster manuellement pour la meilleure vue.
3 Tourner la commande d�ajustement dioptrique jusqu�à ce que les indications dans le viseur soient nettement au point.
Exemple:
4
� Pour ajuster la luminosité du viseur, tirer MENU complètement le viseur et régler �PRIORIT�� sur �VISEUR� ( p. 22, 24).
3 Appuyer sur MENU. LUMINOSIT� �1 L�écran de menu apparaît. Si vous êtes en mode Lecture, passez à l'étape 5.
Commande d�ajustement dioptrique
PR�CAUTION:
Lors du retrait du viseur, veiller à ne pas pincer vos doigts.
4 Appuyer sur 3 ou 4 pour choisir �AFFICHAGE�, puis appuyer sur SET ou 2. Le menu AFFICHAGE apparaît. 5 Appuyer sur 3 ou 4 pour choisir �LUMINOSIT��, puis appuyer sur SET ou 2. L'écran de menu se fermera et le menu du contrôle de la luminosité apparaîtra. 6 Appuyer sur 3 ou 4 jusqu'à ce que la luminosité soit correcte, puis appuyez sur SET ou 2. 7 Appuyer sur MENU. L�écran de menu se ferme.
Montage sur un trépied
Pour �xer le caméscope sur un trépied, aligner le taquet et la vis de direction avec la prise de montage et l�ori�ce de taquet sur le caméscope. Puis serrer la vis dans le sens des aiguilles d�une montre. � Certains trépieds ne sont pas équipés de taquet.
MISE EN ROUTE
|
|
|
> |
|