|
|
|
Categories
|
|
Information
|
|
Featured Product
|
|
|
 |
|
|
There are currently no product reviews.
 ;
Everything is OK. Owner's Manual I downloaded ( I get link for it by email).
;
The only reason I gave this less than 4 stars, is because it shouldn't take 24 hrs to have the download available. I was surprised to find that I had to wait until the next day to be able to download the manual that I paid for.
The manual itself is the correct manual.
 ;
Excellent replacement for original Owner´s Manual. I am totally satisfied!
;
Great service. Manual is as advertised and delivered when promised.
;
Perfect quality, highly appreciated service !!!
Fast delivery of the download info, no issues at all. Recommended E-manual shop !!!
EDITING
EN
43
Dubbing To Or From A Video Unit Equipped With A DV Connector (Digital Dubbing)
It is also possible to copy recorded scenes from the camcorder onto another video unit equipped with a DV connector. Since a digital signal is sent, there is little, if any, image or sound deterioration.
NOTES:
� It is recommended to use the AC Adapter as the power supply instead of the battery pack. ( pg. 15) � If a blank portion or disturbed image is played back on the player during dubbing, the dubbing may stop so that an unusual image is not dubbed. � Even though the DV cable is connected correctly, sometimes the image may not appear in step 4. If this occurs, turn off the power and make connections again. � If �Playback Zoom� ( pg. 26) or �Playback Special Effects� ( pg. 26) is attempted or SNAPSHOT is pressed during playback, only the original playback image recorded on the tape is output from the DV IN/OUT connector. � When using a DV cable, be sure to use the optional JVC VC-VDV204U or VC-VDV206U DV cable.
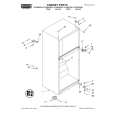
To use this camcorder as a recorder
To DV IN/OUT
1 Make sure all units are turned off. 2 Connect this camcorder to a video unit
equipped with a DV output connector using a DV cable as shown in the illustration.
Core filter
DV cable (optional)
3 Set the camcorder�s Power Switch to �PLAY�. 4 Set �REC MODE� to �SP� or �LP�. ( pg. 35) 5 Start playback on the player. 6 Press the Recording Start/Stop Button to
engage the Record-Pause mode.
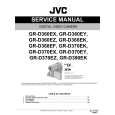
To DV IN/OUT
7 At the point you want to start dubbing, press the Recording Start/Stop Button to start dubbing. The indication rotates. 8 Press the Recording Start/Stop Button again to stop dubbing. The indication stops rotating. 9 Press 8 to return to the normal playback mode.
NOTE:
Digital Dubbing is performed in the sound mode recorded on the original tape, regardless of the current �SOUND MODE� setting. ( pg. 33)
� The � DV IN � indication appears on the screen.
Video unit equipped with DV connector
To use this camcorder as a player
1 Make sure all units are turned off. 2 Connect this camcorder to a video unit
equipped with a DV input connector using a DV cable as shown in the illustration.
3 Start playback on the camcorder. ( pg. 23) 4 At the point you want to start dubbing, start
recording on the video unit. (Refer to the video unit�s instruction manual.)
5 To stop dubbing, stop recording on the video unit, then stop playback on this camcorder.
ADVANCED FEATURES
|
|
|
> |
|