|
|
|
Categories
|
|
Information
|
|
Featured Product
|
|
|
 |
|
|
There are currently no product reviews.
 ;
Great job supplying the manual.
Many of these products weerepretty obscure, so it was great that you had
the manual for it!
;
Great manual, would not have been able to operate my machine without it!!
James Dawson August 18, 2012
;
excellent value & price! Includes everything you need to know about the NN-C777! I would buy this again.
;
Very satisfied! I was searching for several days, but nope; till I discovered your webside and there it was at a very reasonable price. Keep up the good work!
Paul
Flanders
 ;
Generally speaking good copy; a few pages too hard contrast...
Good service and communication.
EN
Power Switch
59
Dubbing From A VCR
[To Use This Camcorder As A Recorder]
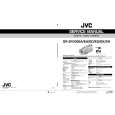
1 Make sure all units are turned off, then connect
the camcorder and the VCR as shown in the illustration. Also refer to pg. 54 and 55.
2 Set �SOUND MODE� to �12 BIT� or �16 BIT� and
To AV To S-VIDEO
�REC MODE� to �SP� or �LP� in the Menu Screen depending on your preference ( pg. 32).
Connector cover**
3 Set the camcorder�s Button locatedto � the switch. Power Switch � while pressing down the Lock on
Turn on the VCR�s power and insert the appropriate cassettes in the camcorder and the VCR.
4 Set �S/AV INPUT� to �ON� in the Menu Screen to
engage the analogue input mode ( pg. 32).
5 Press the Recording Start/Stop Button on the
camcorder to engage the Record-Pause mode. � AV. IN � appears on the screen.
S-Video cable (provided) Audio/Video cable [mini-plug to RCA plug] (provided)
6 Engage the VCR�s Play mode, then engage the
Still Playback mode when you have found a spot just before the edit-in point.
7 Press the Recording Start/Stop Button on the
camcorder to engage the Record mode. rotates on the screen. Engage the VCR�s Play mode.
8 To stop dubbing, press the Recording Start/Stop
Button on the camcorder so that stops rotating, then engage the VCR�s Stop mode.
To AUDIO, VIDEO* and S-VIDEO OUT connectors
9 Repeat steps 6 through 8 for additional editing. 10Set �S/AV INPUT� back to �OFF� in the Menu
Screen to disengage the analogue input mode ( pg. 32).
� It is recommended to use the AC Power Adapter/ Charger as the power supply instead of the battery pack ( pg. 9). � Analogue signals can be converted to digital signals with this procedure. � It is also possible to dub from another camcorder.
VCR (Playback deck)
NOTES:
TV
* Connect when an S-Video cable is not used. ** When connecting the cables, open this cover.
|
|
|
> |
|