|
|
|
Categories
|
|
Information
|
|
Featured Product
|
|
|
 |
|
|
There are currently no product reviews.
 ;
Very well done!!!!! congratulations. It was a bit longer than usual the wiating time even if it was on time (in 24 hours).
;
Last week I bought a second hand BAUKNECHT TRK4850 DRYER. It is a professional machine with many programs and switch options. I feared it would be a huge quest to find a manual. I was delighted when I found owner-manuals.com. After payment I received the file to download the next day already. The quality is great. I am very happy. Thanks!
but kindly the distributions of the operating programs not find in the owners manual,can you help me to understand the operating programs instructions thank you
;
Very good copy, very readable and easy transaction as always.
;
It is perfect, exactly what we needed. It's like the paper version but less clutter.
 ;
Received my manual within 24 hours. Very clear scan of the manual I needed. Thanks!
8
EN
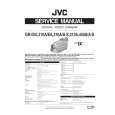
BAT. RELEASE Switch
GETTING STARTED (cont.)
Power
This camcorder�s 2-way power supply system lets you choose the most appropriate source of power. Do not use provided power supply units with other equipment.
1 2 3
Power Switch
CHARGING THE BATTERY PACK
1 2 3 4
Battery pack
Tilt the viewfinder upward 1. With the arrow on the battery pack pointing downward, push the battery pack slightly against the battery pack mount 2, then slide down the battery pack until it locks in place 3. Set the Power Switch to �OFF�. Connect the AC Adapter to the camcorder 4, then connect the Power Cord to the AC Adapter 5. Plug the Power Cord into an AC outlet 6. The CHARGE lamp on the camcorder blinks to indicate charging has started. When the CHARGE lamp stops blinking but stays lit, charging is finished. Unplug the Power Cord from the AC outlet. Disconnect the AC Adapter from the camcorder.
CHARGE Lamp
AC Adapter
To Detach The Battery Pack . . .
.... slide BAT. RELEASE and pull out the battery pack. NOTES: � If the protective cap is attached to the battery pack, remove it first. � During charging, the camcorder cannot be operated. � Charging is not possible if the wrong type of battery is used. � When charging the battery pack for the first time or after a long storage period, the CHARGE lamp may not light. In this case, remove the battery pack from the camcorder, then try charging again. � If the battery operation time remains extremely short even after having been fully charged, the battery is worn out and needs to be replaced. Please purchase a new one. � Using the optional AA-V40 AC Power Adapter/Charger, you can charge the BN-V408U/V416U/V428U battery pack without the camcorder. However, it cannot be used as an AC adapter.
5
4 To DC
connector
6 To AC outlet
Battery pack BN-V408U BN-V416U (optional) BN-V428U (optional) Charging time approx. 1 hr. 30 min. approx. 2 hrs. approx. 3 hrs. 20 min.
For other notes,
pg. 71
|
|
|
> |
|