|
|
|
Categories
|
|
Information
|
|
Featured Product
|
|
|
 |
|
|
There are currently no product reviews.
 ;
I'm so glad I was able to find a site to download my missing manuals. Very reasonable prices and they kept me informed about the process and I had my manual within less than a day. The only thing I wish was an option is a 100% English version with no spanish or anything. But overall great site.
;
The manual is complete with excellent quality! One suggestion, show number of pages and weather it is multi-lingual. The AD 600 Manuel is about 76 pages and over half is non English. This results in a larger print job than usually needed. Having this information, one could select the desired pages for printing.
 ;
I've been looking for a copy of the original user/owner manual. Just what the doctor ordered, thank you.
;
the manual was very helpful thank you very much no one else was able to help me thanx
;
This is an excellent handbook. We had no information on the appliance until we obtained this and are now able to use the appliance to its full potential. Strongly recommended.
8
EN
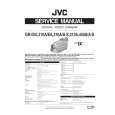
BAT. RELEASE Switch
GETTING STARTED (cont.)
Power
This camcorder�s 2-way power supply system lets you choose the most appropriate source of power. Do not use provided power supply units with other equipment.
1 2 3
Power Switch
CHARGING THE BATTERY PACK
1 2 3 4
Battery pack
Tilt the viewfinder upward 1. With the arrow on the battery pack pointing downward, push the battery pack slightly against the battery pack mount 2, then slide down the battery pack until it locks in place 3. Set the Power Switch to �OFF�. Connect the AC Adapter to the camcorder 4, then connect the Power Cord to the AC Adapter 5. Plug the Power Cord into an AC outlet 6. The CHARGE lamp on the camcorder blinks to indicate charging has started. When the CHARGE lamp stops blinking but stays lit, charging is finished. Unplug the Power Cord from the AC outlet. Disconnect the AC Adapter from the camcorder.
CHARGE Lamp
AC Adapter
To Detach The Battery Pack . . .
.... slide BAT. RELEASE and pull out the battery pack. NOTES: � If the protective cap is attached to the battery pack, remove it first. � During charging, the camcorder cannot be operated. � Charging is not possible if the wrong type of battery is used. � When charging the battery pack for the first time or after a long storage period, the CHARGE lamp may not light. In this case, remove the battery pack from the camcorder, then try charging again. � If the battery operation time remains extremely short even after having been fully charged, the battery is worn out and needs to be replaced. Please purchase a new one. � Using the optional AA-V40 AC Power Adapter/Charger, you can charge the BN-V408U/V416U/V428U battery pack without the camcorder. However, it cannot be used as an AC adapter.
5
4 To DC
connector
6 To AC outlet
Battery pack BN-V408U BN-V416U (optional) BN-V428U (optional) Charging time approx. 1 hr. 30 min. approx. 2 hrs. approx. 3 hrs. 20 min.
For other notes,
pg. 71
|
|
|
> |
|