|
|
|
Categories
|
|
Information
|
|
Featured Product
|
|
|
 |
|
|
There are currently no product reviews.
 ;
Very well done!!!!! congratulations. It was a bit longer than usual the wiating time even if it was on time (in 24 hours).
;
Last week I bought a second hand BAUKNECHT TRK4850 DRYER. It is a professional machine with many programs and switch options. I feared it would be a huge quest to find a manual. I was delighted when I found owner-manuals.com. After payment I received the file to download the next day already. The quality is great. I am very happy. Thanks!
but kindly the distributions of the operating programs not find in the owners manual,can you help me to understand the operating programs instructions thank you
;
Very good copy, very readable and easy transaction as always.
;
It is perfect, exactly what we needed. It's like the paper version but less clutter.
 ;
Received my manual within 24 hours. Very clear scan of the manual I needed. Thanks!
VIDEO RECORDING EN
15
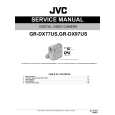
Basic Recording
NOTE:
Before continuing, perform the procedures listed below: � Power ( pg. 11) � Loading A Cassette ( pg. 14) Power Switch Lock Button POWER/CHARGE Lamp Tally Lamp (Lights while recording is in progress.)
Tape Remaining Time
Approximate tape remaining time appears on the display. �� h � � m� means the camcorder is calculating the remaining time. When the remaining time reaches 2 minutes, the indication starts blinking.
� The time required to calculate and display the remaining tape length, and the accuracy of the calculation, may vary according to the type of tape used.
LCD Monitor And Viewfinder
While using the LCD monitor: Make sure the viewfinder is pushed back in. Pull on the bottom end of the LCD monitor to open it. It can rotate 270° (90° downward, 180° upward). While using the viewfinder: Make sure the LCD monitor is closed and locked. Pull out the viewfinder fully.
180�
Power Zoom Lever
Recording Start/Stop Button
VIDEO/MEMORY
1 Remove the lens cap. ( pg. 10) 2 Open the LCD monitor fully. 3 Set the VIDEO/MEMORY Switch to �VIDEO�. 4 Set the Power Switch to �A� or �M� while pressing
down the Lock Button located on the switch.
� The POWER/CHARGE lamp lights and the camcorder enters the Record-Standby mode. �PAUSE� is displayed. � To record in LP (Long Play) mode, pg. 27, 28.
NOTES:
5 To start recording, press the Recording Start/Stop Button. The tally lamp lights and �T REC� appears on the display while recording is in progress. 6 To stop recording, press the Recording Start/Stop Button again. The camcorder re-enters the RecordStandby mode.
Approximate recording time
Tape 30 min. 60 min. 80 min. 30 min. 60 min. 80 min. Recording mode SP 45 min. 90 min. 120 min. LP
� The image will not appear simultaneously on the LCD monitor and the viewfinder except during Interface Shooting. ( pg. 16) When the viewfinder is pulled out while the LCD monitor is opened, you can select which one to use. Set �PRIORITY� to the desired mode in SYSTEM Menu. ( pg. 27, 29) � Colored bright spots may appear all over the LCD monitor or the viewfinder. However, this is not a malfunction. ( pg. 46)
� If the Record-Standby mode continues for 5 minutes, the camcorder�s power shuts off automatically. To turn the camcorder on again, push back and pull out the viewfinder again or close and re-open the LCD monitor. � When a blank portion is left between recorded scenes on the tape, the time code is interrupted and errors may occur when editing the tape. To avoid this, refer to �Recording From The Middle Of A Tape� ( pg. 17). � To turn the tally lamp or beep sounds off, pg. 27, 29.
NOTES:
VIDEO RECORDING & PLAYBACK
 $4.99 GRDX97US JVC
Service Manual Complete service manual in digital format (PDF File). Service manuals usually contains circuit diagr…
|
|
|
> |
|