|
|
|
Categories
|
|
Information
|
|
Featured Product
|
|
|
 |
|
|
There are currently no product reviews.
 ;
Quality as promised it arrived fast. No problems what so ever
;
Good scan, very handy and it also includes the user manual. 122 pages in total.
;
This manual was exactly what I needed. Detailed, useful and delivered as promised.
 ;
Great manual good quality really helped in the repair of my Toshiba, thanks
;
Print was clear and easy to read. Thank you Joe joeoldaudio
1.7 EMERGENCY DISPLAY Whenever some abnormal signal is input to the mechacon CPU, an error number (E01, as an example) is displayed in the electronic view finder. In every error status, such the message as shown below alternately appear over and over.
OFF
�
In an emergency mode, all operations except turning on/off the POWER switch are ineffectual.
Example (in case of the error number E01):
@ @ @ @E01
UNIT IN SAFEGUARD MODE
E01 REMOVE AND REATTACH BATTERY
E. VF E07 E06 E04 E03 E02 E01 E00
Symptom Short circuit of capstan MDA CAPSTAN FG input absent DRUM FF input absent SUPPLY REEL FG input absent Mode control motor rotates for more than 10 sec without shift to next mode. Mode control motor rotates for more than 10 sec without shift to next mode. Overtime the programming transaction
Mode when observed Power ON EDIT DRUM rotation REC, PLAY, SEARCH, FF UNLOADING LOADING REC, PLAY
Resulting mode Power OFF Power OFF Power OFF UNLOADING [Power OFF Power OFF Power OFF Power OFF
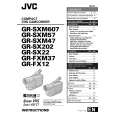
1.8 DEMONSTRATION MODE This model has the DEMONSTRATION mode. 1) How to set the DEMONSTRATION mode. The camera can be entered into the DEMONSTRATION mode by setting on the DISPLAY screen appearing in the viewfinder. When entering the camera into the DEMONSTRATION mode, pay heed to the following matters. No cassette is set in the camcorder or a cassette is set in the camcorder but it is protected from recording. Note 1) The indications of the DISPLAY page very depending on the setting. 2) How to cancel the DEMONSTRATION mode. To cancel the DEMONSTRATION mode, turn the POWER switch off (�POWER OFF�).
2. Turn the MENU WHEEL in the direction of the arrow to set the cursor at �NEXT�. Press the MENU WHEEL once. The second page of the DISPLAY appears on the LCD monitor (or in the viewfinder).
S Y S T EM ME NU T O CAME RA ME NU R E C T I ME OF F I N T . T I ME OF F T E L E MACRO OF F T I T L E L ANG . F R E NCH DA T E / T I ME D EMO MOD E R E T URN OF F
1. Set the POWER switch to turn on the "M". Press the MENU WHEEL once. The first page of the DISPLAY appears on the LCD monitor (or in the viewfinder).
MENU Wheel
CAME RA ME NU T O S Y S T EM ME NU F OCU S AU T O E X POS UR E AU T O M . W. B . AU T O
A
Y A
M
Recording Start/Stop Button
S Y S TEM ME NU NE X T R E C MOD E SP D . Z OOM 50x
See to next page
Fig. 1-8-1 1-12
PL
Display 1
Display 2
|
|
|
> |
|