|
There are currently no product reviews.
 ;
very good manual, with detail and clarity in esquematic diagrams and waveforms .
 ;
Very quality copy of original service manual, which contains the circuit diagrams, PCB and lists of components, well as recommendation for calibration procedures of device, also everything else, that need for repair, tuning and use this oscilloscope.
All presented copies have high-resolution, so you can view all in detail.
This manual will very useful for simple owners and for repairers.
I recommend these manual, because myself is owner of Philips PM3216 and I need sometimes servicing these oscilloscope (principally calibrating).
Also, these document is an example of excellent design of technical documentation.
;
Excellent printing quality.
A complete and very usefull service manual with all details.
GREAT SERVICE AT VERY LOW PRICE!
A+++++++++++++++++++++++++
;
manual excelente completo , diagramas y esquemas bien presentados y buena calidad de imagen.
;
muy buen manual completo de buena calidad de impresion preciso y detallado , muy útil para la reparación.
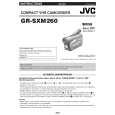
5.2 TAKE OUT CASSETTE TAPE In the event that the set enters the emergency mode as it is loaded with a cassette tape and the cassette tape cannot be ejected with the EJECT button, manually, take it out of the set according to the following procedure. NOTE : � If the mechanism comes into the unloading mode as the cassette tape is not held by hand, it results in tape damage. (1) Disconnect the set from the power source. (2) Remove the LOWER CASE ASSEMBLY and TOP OPE UNIT (see Fig.C1, page 8). (3) Connect a jumper wire to each pole of the LOADING MOTOR as shown by the magnified view (Fig. 5-2-1). (4) While holding down the cassette housing by hand, connect the jumper wires to a battery to run the mechanism to the EJECT position four unloading. If this unloading operation is performed as the cassette housing is not held down by hand, the front lid of the cassette may damage the tape when it is ejected. (5) For taking in the slack of the tape, run the mechanism to the EJECT position as the front lid of the cassette is left open, and turn the TAKE-UP GEAR in the forward direction to wind up the tape. After confirming that the tape has completely been wound up and the supply reel is idling, take the cassette tape out of the cassette housing.
BATTERY
(DC1.5V)
MAGNIFIED VIEW b
TAKE-UP GEAR
Fig.5-2-1
1-22 (No.YF016)
|