|
|
|
Categories
|
|
Information
|
|
Featured Product
|
|
|
 |
|
|
There are currently no product reviews.
 ;
Copy of genuine owners/operators manual, very useful
;
The manual was a perfect match and was exactly what I was looking for. I'm very satisfied with my purchase.
;
Thank you for having the manual I needed for an older model Aiwa stero I had found on Ebay --- I wanted the Aiwa because I had tapes and cd's but I did not have a manual as to how to operate the system... I found what I needed and it has enabled me to set the system up for my enjoyment.
;
I wished detailed information of the JBL S310 and here I found it! Very happy with the service from this site!
;
The manual was very helpfull, it answerdes all my questions, and i was surprized to find the original manual on this site! Big thumbs uP:)
GETTING STARTED
Hook on
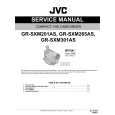
Using the Battery Pack
Perform step 1) of �Charging the Battery Pack�. Approximate recording time (unit: min.)
Battery Pack View�nder on LCD monitor on
GETTING STARTED
BN-V10U
Push in
100 (90) 105 (95) 170 (155) 400 (350)
80 (70) 85 (75) 140 (120) 330 (285)
Power Switch BATTERY RELEASE Switch Battery pack
BN-V12U (optional) BN-V20U (optional) BN-V400U (optional)
To AC outlet
To DC IN connector AC Adapter
( ): When the video light is on (GR-SXM301AS only)
Using AC Power
Connect the AC Adapter to the camcorder ( step 2) of �Charging the Battery Pack�). � The provided AC Adapter features automatic voltage selection in the AC range from 110V to 240V.
Charging the Battery Pack
1) Hook the end of the battery pack to the camcorder and push the battery in until it locks in place. � If the battery pack is attached wrongly, a malfunction may occur. 2) Set the Power Switch $ to �OFF� while pressing down the Lock Button #. Connect the AC Adapter to the DC IN connector !, then connect the Power Cord to the AC adapter. 3) The CHARGE lamp % blinks to indicate charging. 4) When the CHARGE lamp % stops blinking and turns off, charging is �nished. Unplug the AC Adapter from the AC outlet. Disconnect the AC Adapter from the camcorder.
ATTENTION:
Before detaching the power source, make sure that the camcorder�s power is turned off. Failure to do so can cause the camcorder to malfunction.
REFRESH:
Be sure to fully discharge a battery pack before recharging or storing it for a long period of time, otherwise the battery performance will be reduced. 1) Perform steps 1) through 3) of �Charging the Battery Pack�. 2) Press REFRESH " for over 4 seconds. The CHARGE lamp % blinks faster to indicate discharging. 3) When discharging is �nished, charging automatically starts and the CHARGE lamp % blinks normally.
To Detach The Battery Pack�
� slide BATTERY RELEASE 9 and pull out the battery pack. Battery Pack BN-V10U BN-V12U (optional) BN-V20U (optional) BN-V400U (optional) Charging time approx. 1 hr. 30 min. approx. 1 hr. 40 min. approx. 2 hrs. 40 min. approx. 5 hrs. 10 min.
Charging time is for a fully discharged battery pack.
6
|
|
|
> |
|