|
|
|
Categories
|
|
Information
|
|
Featured Product
|
|
|
 |
|
|
There are currently no product reviews.
 ;
This was a hard to find manual. When I did find it , some sites wanted way too much for the file.
Owner-manual .com had it for a really reasonable price. Not only that but it was sent very quickly and was a quality scanned document, unlike some others I purchased from a different site.
Good job guys!!
Larry
;
Fast and courteous service. Product delivered as described. Thank you.
;
Last week I bought a second hand Panasonic AG-7500 SVHS Hi-Fi Video Cassette Recorder. It is a professional machine with many video and audio options. I feared it would be a huge quest to find a manual. I was delighted when I found owner-manuals.com. After payment I received the file to download the next day already. The quality is great. I am very happy. Thanks!
;
The owner's manual/operating instructions that I purchased was the original factory document and it was in at least three and maybe more languages. I no longer have it because I sold the tape recorder and included the owner's manual/operating instructions and a service/repair manual that I bought on ebay for the new owner.
;
This manual is very useful. Because pioneer sx-q180 is unhandy to use without manual.
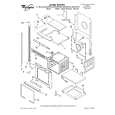
Convection Broiling
1
Timed Cooking
WARNING
Food Poisoning Hazard Do not let food sit in oven more than one hour before or after cooking. Doing so can result in food poisoning or sickness.
Timed Cooking allows the oven to be set to turn on at a certain time of day, cook for a set length of time, and/or shut off automatically. Delay start should not be used for food such as breads and cakes because they may not bake properly.
2
1. Broil element 2. Convection fan
During convection broiling, the broil element cycles on and off in intervals to maintain the oven temperature, while the fan constantly circulates the hot air. If the lower oven door is opened during convection broiling, the broil element and fan will turn off immediately. They will come back on once the door is closed.
To Set a Cook Time:
1. Press BAKE or CONV BAKE. Press the number pads to enter a temperature other than the one displayed. 2. Press COOK TIME. 3. Press the number pads to enter the length of time to cook. 4. Press START/ENTER. The start time, stop time, vertical bar countdown and minute time countdown will appear on the lower oven display. When the stop time is reached, the lower oven will shut off automatically and �End� will appear on the lower oven display. If enabled, end-of-cycle tones will sound, then reminder tones will sound every minute. 5. Press lower oven OFF/CANCEL or open the lower oven door to clear the display and/or stop reminder tones.
To Convection Broil:
Before convection broiling, see the �Broiling and Custom Broiling� section for general broiling guidelines and rack positioning. Allow the oven to preheat for 5 minutes. Position food on the grid in the broiler pan, then place it in the center of the oven rack with the longest side parallel to the door. Close the door. 1. Press CONV BROIL. Press the number pads to enter a temperature other than 450°F (232°C). The convection broil range can be set between 170°F and 500°F (77°C and 260°C). 2. Press START/ENTER. The set oven temperature will appear on the lower oven display until oven is turned off. 3. Press OFF/CANCEL when finished cooking.
To Set a Cook Time and Stop Time [Delay Start]:
Before setting, make sure the clock is set to the correct time of day. See �Clock� section. 1. Press BAKE or CONV BAKE. Press the number pads to enter a temperature other than the one displayed. 2. 3. 4. 5. 6. Press COOK TIME. Press the number pads to enter the length of time to cook. Press STOP TIME. Press the number pads to enter the time of day to stop. Press START/ENTER. The start time is automatically calculated and displayed. �DELAY� and the stop time will also appear on the lower oven display. When the start time is reached, the oven will automatically turn on. The vertical bar countdown and minute time countdown will appear on the lower oven display. When the stop time is reached, the lower oven will shut off automatically and �End� will appear on the lower oven display. If enabled, end-of-cycle tones will sound, then reminder tones will sound every minute. 7. Press lower oven OFF/CANCEL or open the lower oven door to clear the display and/or stop reminder tones.
11
|
|
|
> |
|