|
|
|
Categories
|
|
Information
|
|
Featured Product
|
|
|
 |
|
|
There are currently no product reviews.
 ;
Everything is OK. Owner's Manual I downloaded ( I get link for it by email).
;
The only reason I gave this less than 4 stars, is because it shouldn't take 24 hrs to have the download available. I was surprised to find that I had to wait until the next day to be able to download the manual that I paid for.
The manual itself is the correct manual.
 ;
Excellent replacement for original Owner´s Manual. I am totally satisfied!
;
Great service. Manual is as advertised and delivered when promised.
;
Perfect quality, highly appreciated service !!!
Fast delivery of the download info, no issues at all. Recommended E-manual shop !!!
Cuisine
Wartung und Pflege
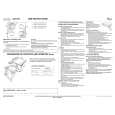
Vor jeder Reinigungs- und Wartungsarbeit das Gerät ausschalten und Wasserhahn schlie�en. Reinigung au�en: Falls die Au�enseite des Geschirrspülers verschmutzt ist, können Sie diese mit einem schonenden Haushaltsreiniger feucht abwischen. Die Bedienungsblende nur mit einem leicht angefeuchteten Tuch abwischen. Verwenden Sie keine Scheuermittel. Reinigung innen: Die Türdichtung und die Türinnenseite regelmä�ig mit einem feuchten Tuch abwischen, um Speisereste zu entfernen.
Oberer Sprüharm: 1. Mutter lösen (nach links drehen) (A) und Sprüharm nach unten abziehen (B). 2. Düsen ausspülen. 3. Sprüharm wieder mittig auf den Drehkegel aufsetzen und einrasten lassen. Unterer Sprüharm: 1. Beide Hebel am Sprüharm (C) nach innen drücken, Sprüharm nach oben abziehen (D). 2. Düsen abspülen. 3. Sprüharm wieder mittig in Rotornabe einführen.
4. Mutter anziehen (nach rechts drehen). Die Mutter muss fest sitzen; klick!
A
Sprüharm muss frei drehbar sein.
B
4. Sprüharm nach unten drücken, bis er einrastet. 5. Klipse müssen korrekt eingerastet sein; klick!
C
D
C
Sprüharm muss frei drehbar sein.
|
|
|
> |
|