|
|
|
Categories
|
|
Information
|
|
Featured Product
|
|
|
 |
|
|
There are currently no product reviews.
 ;
very helpful, the information in these manuels are very detailed
;
Please tell us what you think and share your opinions with others. Be sure to focus your comments on the product. You will receive $2.00 of store credit for Your review.
;
Please tell us what you think and share your opinions with others. Be sure to focus your comments on the product. You will receive $2.00 of store credit for Your review.
;
Good copy and great customer service! There was some confusion with my order and it was resolved promptly!
;
Having bought a pre-owned Sony FM stereo tuner through eBay, it came without any manuals. It soon became clear that to get the best from this excellent tuner I needed a decent manual because much of the operation was not intuitive to a newboy to hi fi like me. I managed to download the official Sony multi-lingual manual from Owner-Manuals.com with no problem at all - a really quick and easy service. I'm very glad I did because I found out all the operations of the tuner and was then able to not only set it up quickly but also to get much more from it that poke-and-hope trialling would ever achieve. In my book $4.99 very well spent.
GX-900H/GX-2200H Guitar Amplifiers
by
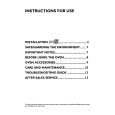
The Front Panel:
18 17
3 2 1 0 10
16 15 14 13 12 11 10 9 8
4 5 6 73 82 91 0 10 4 5 6 7 8 9 3 2 1 0 10 4 5 6 73 82 91 0 10 4 5 6 73 82 91 0 10 4 5 6 73 82 91 0 10 4 5 6 7 8 9 3 2 1 0 10 4 5 6 73 82 91 0 4
7
5 6 73 82 91 10 0 4
6
5 6 73 82 91 10 0 4
5
5 6 73 82 91 10 0 4
4
5 6 7 8 9 10
32
4 3 2 1 0 10 5 6 7 8 9
1
Footswitch
Channel B
Channel A
Level
High
Mid
Low
Level
High
Mid
Low
Gain Two
Gain One
Input
1. INPUT: Accepts the mono 1/4� plug of the signal cable from your guitar or wireless receiver. CHANNEL A, the distortion channel: 2. GAIN ONE: Sets the signal gain for the distortion channel, thus controlling the amount of distortion. Serves as the �low to medium distortion control;� accessible through the gain select switch (#3) or a footswitch. Gives you sounds from nearly clean to really crunchy. 3. GAIN SELECT: Switches between the two gain controls (#2, 4). Switch in, gain two is selected (gain one is disabled) � both LEDs light. Switch out, gain one is selected � only the LED under the word �one� lights. When a footswitch is used, this switch doesn�t do anything, but the LEDs work the same. 4. GAIN TWO: Also sets the gain for the distortion channel. Serves as the �low to high distortion control,� also accessible through the gain select switch (#3) or a footswitch. Gives you sounds from nearly clean to screaming dirty. Acts as a third channel: set gain one for a rhythm crunch, set gain two for screaming leads. Be more creative, more expressive; have more fun! 5. LOW: Sets the level of the lower frequencies for the distortion channel. Offers a range of 18 dB at 100 Hz.
6. MID: Sets the level of the middle frequencies for the distortion channel. Offers a range of 10 dB at 1 kHz. 7. HIGH: Sets the level of the upper frequencies for the distortion channel. Offers a range of 17 dB at 6 kHz 8. LEVEL: Controls the overall volume level for the distortion channel. 9. CHANNEL SELECT: Switches between the clean channel (switch out, LED on) and the distortion channel (switch in, LED off). When a footswitch is used, this switch doesn�t do anything. CHANNEL B, the clean channel: 10. LOW: Sets the level of the lower frequencies for the clean channel. Offers a range of 25 dB at 70 Hz. Lets you fatten up the bottom end of your sound. 11. MID: Sets the level of the middle frequencies for the clean channel. Offers a range of 14 dB at 800 Hz. Lets you create sounds from �in the distance� to �in your face.� 12. HIGH: Sets the level of the upper frequencies for the clean channel. Offers a range of 29 dB at 10 kHz. Lets you add brilliance and crystal clear highs to your sound. 13. LEVEL: Controls the overall volume level for the clean channel.
14. BRIGHT: Boosts the upper frequencies when pressed in. Adds a brightness to the sound. Off in the out position. 15. REVERB, CHANNEL A: Sets the amount of reverb effect applied to channel A. Turned all the way to the left (�0�) the signal is �dry� (no reverb). Turning it towards the right increases the wetness (amount of reverb) of the signal. 16. REVERB, CHANNEL B: Sets the amount of reverb effect applied to channel B. Turned all the way to the left (�0�) the signal is �dry� (no reverb). Turning it towards the right increases the wetness (amount of reverb) of the signal. 17. FOOTSWITCH: Accepts the stereo 1/4� plug from a two-button footswitch (such as Crate�s CFP-2) for remote channel switching and switching between gain one and gain two on channel A. Ring controls channel selection, tip controls the gains. With a footswitch plugged in, the front-panel switches #3 and #9 don�t do anything. 18. POWER: (not shown): Turns the amp on and off, �on� being the UP position. The ON LED next to the Excalibur logo lights when the amp is turned on.
4
|
|
|
> |
|