|
|
|
Categories
|
|
Information
|
|
Featured Product
|
|
|
 |
|
|
There are currently no product reviews.
 ;
Great service manua!
Always great value and fast service A++++++++++++++++++
;
Excellent Service manual, good quality scans, quick service and very good value. Well reccomended ! All good.
;
Great value service manual!
Good-quality scans. Detailed and valuable informations.
A+++++++++++++++
;
Great value service manual!
Good-quality scans. Detailed and valuable informations.
A+++++++++++++++
;
Excellent scan quality. A complete and very useful manual with all details.
Great service at low price A+++++++++++++++++
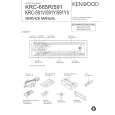
Note : Clear RF signal waveform means that the shape � � � can be clearly distinguished at the center of the waveform.
RF signal waveform VOLT/DIV : 200mV TIME/DIV : 500ns
Adjustment Location: [BD BOARD] (Conductor Side)
level : 1.45 ± 0.3Vp-p
E-F Balance (1 Track jump) Check
oscilloscope BD board TP(TEO) TP(VC)
12 TP (TEO)
TP (AGCCON) IC103 1 24 40 41 TP (FEI)
TP (XPCK) 21 20 1 80 60 61
Procedure : 1. Connect oscilloscope to TP (TEO) and TP (VC). 2. Turned Power switch on. 3. Load a disc (YEDS-18) and playback the number five track. 4. Press the gG button. (Becomes the 1 track jump mode.) 5. Confirm that the level B and A (DC voltage) on the oscilloscope waveform.
1 track jump waveform center of waveform B 0V level=1.3±0.6Vp-p Specified level: �� � 100=less than ±22% A B symmetry A (DC voltage)
TP (FEO) TP (VC)
IC101
TP (RF)
TP (DGND)
6. After check, remove the lead wire connected in step 1. RF PLL Free-run Frequency Check Procedure : 1. Connect frequency counter to test point (XPCK) with lead wire.
BD board TP (XPCK) frequency counter
2. Turned Power switch on. 3. Put the disc (YEDS-18) in to play the number five track. Confirm that reading on frequency counter is 4.3218MHz.
20
|
|
|
> |
|