|
|
|
Categories
|
|
Information
|
|
Featured Product
|
|
|
 |
|
|
There are currently no product reviews.
 ;
El producto satisface las necesidades del servicio t
;
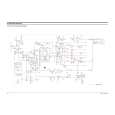
This is a good quality scan of the Operation & Maintenance (Service) Manual for the PAL version of this high-band broadcast umatic, BVU-800P
All schematics and lineup procedures appear to be included in this one manual AFAICT.
The file size is just over 113 MB which gives an idea of the quality and number of pages.
All of the schematics, which contain some fairly small print, are easily readable when you zoom into the page.
John Thompson, Newcastle Upon Tyne, England.
;
Good quality, all schematics of few of models. There is also short form of user manual and regulation manual.
;
Perfect copy of the service manual. you can enlarge every page, and it comes up
with all details.
;
It´s very very nice manual with all, what i need. Original in good quality. Very fast business. Very much thanks...
3. The tape A runs in fast forward. After two minutes of fast forward, or at the shut-off point, the tape is stopped and the aging mode advances to the next step. The message: TAPE A AG-3 appears. 4. The tape A is played back in the RVS mode. After two minutes of the RVS playback, the aging mode advances to the next step. The message: TAPE A AG-4 appears. 5. The tape A is rewound and stops at the shut-off. The aging mode advances to the next step. The message: TAPE A AG-5 appears. 6. The tape B is played back in the FWD mode. After two minutes of the FWD playback, the aging mode advances to the next step. The message: TAPE B AG-2 appears. 7. The tape B runs in fast forward. After two minutes of fast forward, or at the shut-off point, the tape is stopped and the aging mode advances to the next step. The message: TAPE B AG-3 appears. 8. The tape B is played back in the RVS mode. After two minutes of the RVS playback, the aging mode advances to the next step. The message: TAPE B AG-4 appears. 9. The tape B is rewound and stops at the shut-off. The aging mode advances to the next step. The message: TAPE B AG-5 appears.
[AM TUNER STEP 9 kHz/10 kHz Selection Mode] * Either the 9 kHz step or 10 kHz step can be selected for the AM channel step. Procedure: 1. Turn on the power and select TUNER using the FUNCTION button. 2. Select AM with the TUNER/BAND button and turn off the power. 3. Press the two buttons ENTER and @/1 at the same time. The main power is turned on and the other frequency step of the previous mode is selected and displayed. �AM 9 k STEP� or �AM 10 k STEP�
[CD SRAM Test Mode] Procedure: 1. Turn on the power and select CD using the FUNCTION button. 2. Press the three buttons x , ENTER and DBFB at the same time. 3. The message �SRAM OK� appears on the fluorescent indicator tube.
[GC VACS ON/OFF Mode] Procedure: 1. Press the two buttons DELETE and @/1 at the same time. 2. The message �VACS ON� or �VACS OFF� appears on the fluorescent indicator tube.
17
|
|
|
> |
|