|
|
|
Categories
|
|
Information
|
|
Featured Product
|
|
|
 |
|
|
There are currently no product reviews.
 ;
Thank you for your manual It has the basic things to and i use the Oszi for Longer Time.
THX
;
Actually, I was looking for this information for 3 years!...now thanks to you, the manual is on my hands and of great help, cause I understand now where I was doing wrong connections and wires...excellent, I'll be back to you if in need, thank you.
 ;
This manual covers the main equipment features only. While it also includes the procedure for saving and loading from the now long obsolete memory cards it does not mention the how to operate with the optional floppy drive interface so I am still at a loss about how to use this! Note that there is a separate manual covering the MIDI interface and programming via the keyboard, not included in this download. You will also need to get hold of this if you want to use the MIDI interface properly. Basically there is little difference between this manual and the free to download manual for the similar PR60 model.
;
Good list of manuals. I found a very rare one and easily get. Should be promptly to download, as we must to wait hours even after confirmed payment.
;
The manual was properly scanned and perfectly readable. The only small problem is that I couldn't use my dear Ctrl + F to find a word I needed.
4
ENGLISH
Important
� Do not use the appliance if the plug, the cord or the appliance itself is damaged.
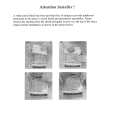
Preparing the appliance for use
1
Before you connect the appliance, check whether the mains voltage indicated on the appliance corresponds to the mains voltage in your home.
2 Place the appliance on a horizontal surface. Do not put the appliance on a hot surface. Keep the appliance out of the reach of children and make sure that they are unable to pull at the cord.
C C
3 Put the plug in an earthed wall socket. You can store excess cord at the back of the appliance. Prevent the cord from coming into contact with hot surfaces. 4
Fill the water tank with water and put the jug in place.
C
5 Switch the appliance on by pressing the button. The pilot light goes on. Let the appliance run until the water tank is completely empty.
C
6
Switch the appliance off after use.
Let the appliance cool down for at least 3 minutes before you start brewing coffee.
|
|
|
> |
|