|
|
|
Categories
|
|
Information
|
|
Featured Product
|
|
|
 |
|
|
There are currently no product reviews.
 ;
Everything okay, thanks a lot. It was a pleasure for me to make a deal with you.
;
A deal without problems, very fast and the manual is a good quality. Sorry for the my english.
;
Superb service and excellent quality of the document received
;
no problems with the purchase of a circuit diagram
;
Scan are good quality and overall just what i was looking for. Thanks!
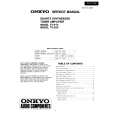
3-2. Replacing the Filter Disk Unit
4. Adjust the indication (ND, CC) of the filter knob to coincide with respective ND, CC of the new filter disk unit, respectively as shown below. 5. Pulling the filter knob (CC) to the arrow direction, then install the new filter disk unit in the camera. n At installation, do not touch the surfaces of filters.
Filter knob (CC)
7. Be sure that ND of the filter disk unit is correspondingly linked to the filter knob (ND) and do CC to (CC) in the same fashion by means of turning the filter knob (ND, CC). 8. Fix the filter disk unit using two screws, then connect a connector. n There is an occasion need to tune up a balance for torque of the filter knob (ND, CC) when a replacement of a filter disk unit is performed. In this case loosen two screws first, then make the knob have 1 or 2 turns for adjusting torque. After making sure of the right torque, tighten the screws again.
Loosen each screw
FilterMOTORunit disk
ON OFF
ND
1
B
1
1 CLEAR 2 1/4 ND 3 1/8 ND 4 1/16ND 5 1/64ND
CC B
A CROSS B CLEAR C 4300K D 6300K E 8000K
6. Little by little turning the filter knob (ND, CC) to left or right direction, have knob (ND, CC) and the filter disk unit ND, CC to be coincided properly.
HDC-900/950 MM
3-3 (E)
|
|
|
> |
|