|
|
|
Categories
|
|
Information
|
|
Featured Product
|
|
|
 |
|
|
There are currently no product reviews.
 ;
Fast access, 100% correct and complete service manual
;
just what i was seeking .had a password issue but the review allowed me to circumvent and download was great
;
Great manual, great price. Has a few of the basic operating instructions that most service manuals leave out. Complete instructions for disassembling board by board, safety precautions, schematics, complete parts list.
;
I am very pleased with the service manual for my RT-909. This was an easy purchase and great procuct, and much cheaper than other venues i had looked at. This web site is now listed in my favorites list. KEEP UP THE GOOD WORK. THANKS. J. BROWN
;
A very well written and easy to understand manual.
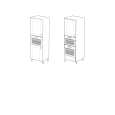
1-4. Usage of the Extension Board
6. With the eject levers 2 and rails opened, insert the plug-in board whose operations are to be checked along the rails of the extension board and push it into the connectors.
9. Open the eject levers 1 of the extension board in the direction of the arrow.
Eject levers 2
Eject lever 1
Rail
Extension board
Eject lever 1
(illustration of the HDS-X3700)
Plug-in board Rail
(illustration of the HDS-X3700)
10. Pull out the extension board from the unit. 11. Attach the plug-in board, wiring terminal drop-safe assembly, and front panel.
7. Adjust the plug-in board or check the operations of the plug-in board. 8. After adjusting or checking the operations, push the eject levers 2 of the extension board in the direction of the arrow and pull out the plug-in board from the rails of the extension board.
Eject levers 2
Plug-in board
(illustration of the HDS-X3700)
1-8 (E)
HDS-X3400/X3600/X3700
|
|
|
> |
|