|
|
|
Categories
|
|
Information
|
|
Featured Product
|
|
|
 |
|
|
There are currently no product reviews.
 ;
very helpful, the information in these manuels are very detailed
;
Please tell us what you think and share your opinions with others. Be sure to focus your comments on the product. You will receive $2.00 of store credit for Your review.
;
Please tell us what you think and share your opinions with others. Be sure to focus your comments on the product. You will receive $2.00 of store credit for Your review.
;
Good copy and great customer service! There was some confusion with my order and it was resolved promptly!
;
Having bought a pre-owned Sony FM stereo tuner through eBay, it came without any manuals. It soon became clear that to get the best from this excellent tuner I needed a decent manual because much of the operation was not intuitive to a newboy to hi fi like me. I managed to download the official Sony multi-lingual manual from Owner-Manuals.com with no problem at all - a really quick and easy service. I'm very glad I did because I found out all the operations of the tuner and was then able to not only set it up quickly but also to get much more from it that poke-and-hope trialling would ever achieve. In my book $4.99 very well spent.
EN
63
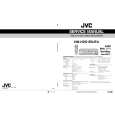
B Select the recording deck.
Press HDD or S-VHS.
C Set the recorder�s input mode.
Press AUX (number key �0�) and/or PR to select �F-1�.
� Set �F-1 INPUT� to �VIDEO� for the VIDEO input connector, or �S-VIDEO� for the S-VIDEO input connector, depending on the connector being used ( pg. 65).
D Set the edit mode. (VHS deck only)
See �PICTURE CONTROL� on page 77.
E Start the camcorder.
Engage the Play mode of the camcorder.
F Start the recorder.
Engage the Record mode of the recorder.
� All necessary cables can be obtained from your dealer. � When you select �EDIT� to dub tapes in step D, be sure to select �AUTO� (or �NORM� when �B.E.S.T.� is set to �OFF�) after you finish dubbing the tapes. � For HDD deck, the recording pause takes effect only when the recorder is recording on the HDD deck with the channel set to �L-1�, �F-1�, or �DUB�. The recording pause is released in 5 minutes automatically. Picture and sound may be distorted at the point where the recording pause is released.
NOTES:
 $4.99 HMHDS1EK JVC
Service Manual Complete service manual in digital format (PDF File). Service manuals usually contains circuit diagr…
|
|
|
> |
|