|
|
|
Categories
|
|
Information
|
|
Featured Product
|
|
|
 |
|
|
There are currently no product reviews.
 ;
Well Well Well!!!! Good manual perfect for my hobby!!! As Before you have done a very well done work!!!! Thank you
;
Super nice! Good to have a manual in digital format.
;
Great job supplying the manual.
Many of these products weerepretty obscure, so it was great that you had
the manual for it!
;
Great manual, would not have been able to operate my machine without it!!
James Dawson August 18, 2012
;
excellent value & price! Includes everything you need to know about the NN-C777! I would buy this again.
EDITING
EN
You can use your VCR as the player or the recorder.
51
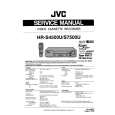
Edit To Or From Another 1 VCR
Player VIDEO OUT Your VCR
MAKE CONNECTIONS
Connect an AV cable between the player�s VIDEO OUT and AUDIO OUT connectors and the recorder�s VIDEO IN and AUDIO IN connectors.
� If using another VCR with an S-VIDEO input or output connector, it is recommended to use the S-VIDEO connection to minimize picture degradation while editing. � When using your VCR as the recorder and a monaural VCR as the player, connect the player�s AUDIO OUT connector to the AUDIO IN L connector on the recorder.
LOAD CASSETTES
2
S VIDEO OUT AUDIO OUT Audio/Video cable (supplied) S-Video cable (supplied)
Insert the playback cassette into the player and the cassette to be recorded on into the recorder.
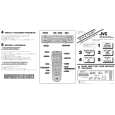
SET RECORDER�S INPUT MODE
Set to "AUX". With this VCR, press the NUMBER key "0"
3
and/or CH to select depending on the connector being used � "L-1" for the rear AUDIO/VIDEO IN connector, or "F-1" for the front AUDIO/VIDEO IN connector.
NOTE:
S VIDEO IN AUDIO IN
If you use your VCR as the recorder and have connected another VCR to your VCR's S-VIDEO IN connector, you need to set "REAR AUX INPUT" to "S-VIDEO" at the Function screen. Follow steps 4 � 6 from the "Edit From A Camcorder" section ( pg. 52).
ENGAGE TAPE DUBBING MODE
Recorder VIDEO IN Another VCR
4 5 6
Follow steps 12 � 14 from the "Edit From A Camcorder" section ( pg. 53).
START PLAYER
Advantages Of S-VHS Editing
S-VHS allows you make high resolution video recordings when dubbing from one VCR to another. You can edit from VHS to S-VHS, from S-VHS to VHS, or from S-VHS to S-VHS. � From VHS to S-VHS (VIDEO-VIDEO connection): Record VHS playback signals in the S-VHS mode. Although the picture quality is inherently limited by the orignal VHS source material, the edited tape has better picture quality than those made by VHS-to-VHS editing. � From S-VHS to VHS (VIDEO-VIDEO connection): Because the picture quality of the source material is very high, the edited tape has better picture quality than those made by VHS-to-VHS editing. � From S-VHS to S-VHS (S-VIDEO connection): A high resolution copy is made of a high resolution original SVHS tape with minimal picture degradation. This is the preferred method of video dubbing. Set to its play mode.
NOTE:
If the player is equipped with a superimpose/OSD disable feature then set "SUPERIMPOSE" to OFF before pressing PLAY ( pg. 28).
START RECORDER
Set to its record mode.
NOTES:
� Be sure to set "TAPE DUB MODE" back to "OFF" when you finish editing. � When "TAPE DUB MODE" is set to "ON" Active Video Calibration is deactivated in order to provide better picture quality edits. � If you use an auxiliary input to connect a cable box or DBS receiver make sure that the correct input ("L-1", "F-1" or "SVIDEO") is selected after you have finished editing ( step 6, page 52).
 $4.99 HR-S4500U JVC
Quick Start Quick start guide ( sometimes called quick guide ) contains most important information on how to use…
|
|
|
> |
|