|
|
|
Categories
|
|
Information
|
|
Featured Product
|
|
|
 |
|
|
There are currently no product reviews.
 ;
Good quality, all schematics of few of models. There is also short form of user manual and regulation manual.
;
Perfect copy of the service manual. you can enlarge every page, and it comes up
with all details.
;
It´s very very nice manual with all, what i need. Original in good quality. Very fast business. Very much thanks...
;
Purchased the manual that I was looking for at a great price and could download it easily.. Great service experience and for future purchases I plan to use the site.
Thank you very much
;
Exactly what was needed to assess the product - excellent value and great service
WHEN REPLACING EEPROM (MEMORY) IC
If a service repair is undertaken where it has been required to change the MEMORY IC, the following steps should be taken to ensure correct data settings while making reference to TABLE 1. NOTE: No need setting for after INI 2D. INI 00 10 20 +0 0A AF 29 +1 A0 97 01 +2 CA 95 15 +3 10 8A 77 +4 64 40 61 +5 64 55 31 +6 4A 31 29 +7 86 04 04 +8 0B 24 00 +9 2F A5 00 +A 86 9F 00 +B 2F 3A 00 +C 0A 00 A2 +D 08 10 B0 +E 0A BF --+F 0F 00 ---
Table 1 1. Connect the set to TV Monitor. 2. Turn on the POWER. 3. Press both CH UP button on the set and the FF button on the set for more than 2 seconds. ADDRESS and DATA will appear on TV Monitor as Fig 1. 4. ADDRESS is now selected and should �blink�. Using the SET + or - button on the remote, step through the ADDRESS until required ADDRESS to be changed is reached. 5. Press ENTER to select DATA. When DATA is selected, it will �blink�. 6. Again, step through the DATA using SET + or - button until required DATA value has been selected. 7. Pressing ENTER will take you back to ADDRESS for further selection if necessary. 8. Repeat steps 4 to 7 until all data has been checked. 9. When satisfied correct DATA has been entered, turn POWER off (return to STANDBY MODE) to finish DATA input. The unit will now have the correct DATA for the new MEMORY IC.
ADDRESS DATA
INIT 00 0A PLAY/REC 0010
Fig. 1
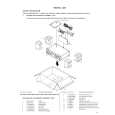
DISC REMOVAL METHOD AT NO POWER SUPPLY
1. Remove the Top Cabinet and Front Cabinet. (Refer to item 1 of the DISASSEMBLY INSTRUCTIONS.) 2. Rotate the white gear of Deck CD section in the direction of the arrow by hand, remove the disc from Deck CD.
Gear (White)
Deck CD
<NOTE> WHEN "N" IS ALWAYS BEING DISPLAYED ON THE TV MONITOR. (REMOTE CONTROLLER FORMAT)
This product is usable the remote controller which is used by DVD+VHS of the other brand. If "N" is always being displayed on the TV monitor, can not control from provided remote controller since this product is other brand format. � How to return a JVC format. Turn off the power of the set and push the CHANNEL+ button and the REC button of the set simultaneously.
1-3
 $4.99 HR-XVC1UM JVC
Parts Catalog Parts Catalog only. It's available in PDF format. Useful, if Your equipment is broken and You need t…
|
|
|
> |
|