|
There are currently no product reviews.
 ;
We received the manual in a timely manner and it was exactly what we were expecting.
;
Excellant, finally this is want I need and searching for The service manual is fantastic and thank you to owner-manuals.com and its service. Price is reasonable. It's a bit slow on my end in downloading but manage to receive the whole manual without a break. once again, thanks.
;
Very good scanning quality. All schematics are very legible. Worth every cent !
;
Excellent quality, very quick download turnaround, will definately use again.
 ;
This is a awesome quality scan of the original Service Manual for Technics 8099.
Contains the circuit diagram, PCB layout, adjust/tune instructions as well.
Since this is my first buy here, i'm really glad! This site do works as intended/described, it's definitely not scam!
Мои рекомендации! Все мануалы настоящие!
3.2
Loading mechanism assembly
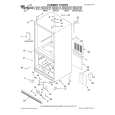
3.2.1 Removing the tray (See Figure 3-2a, Figure 3-2b, Figure 3-2c, Figure 3-2d, Figure 3-2e, Figure 3-2f) (1) Push a of the slide cam on the hole in the right side of the Tray loading base by using a driver until it stops. (See Figure 32a.) (2) The tray comes out. Pull the tray in a front direction until it stops. (3) Remove the two screws A attaching the slide bracket. (See Figure 3-2b.) (4) Tilt the tray in a direction of the arrow around the point in the left rear part of the tray. (See Figure 3-2c.) (5) The rail of the tray is removed from b of the loading base. Then, remove the tray upward. (See Figure 3-2d.) Attaching the tray: Engage c of the loading base to the projection of the tray while tilting the tray to the left. Turn the tray in a direction of the arrow, and attach the slide bracket. (See Figure 3-2e.) Note: Prior to the procedure above, move the slide cam in a direction of the arrow so that d of the slide cam can be inserted in e of the tray. (See Figure 3-2f.)
The point in the left rear part Fig.3-2c
Tray
Loading base part b
Rail of the tray
Fig.3-2d
Push Slide cam part a Fig.3-2a Loading base Projection of the tray Tray
A
Slide bracket
A
Loading base part c
Fig.3-2e
Part e
Fig.3-2b
Part d
Slide cam
Fig.3-2f
1-12 (No.YD052)
|