|
There are currently no product reviews.
 ;
Quick delivery, the document was usefull, although the copy was i little bit unclear in the details.
 ;
A complete and well done copy of the manual, at a not expansive price!
The delivery of the manual is very fast.
Thank you for all
;
Perfect quality. Was able to fix speed drifting on my Sansui Turntable using the service manual instructions for PLL adjustment.
;
I am very happy regarding the online purchase of this manual from Owner-Manuals.com as with this I could set right my Denon CD player and Amplifier.
I once again sincerely thank them for the prompt service which was rendered to me.
N. Shanker
;
More than pleased with my prurchase, very good product for the price.
�
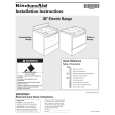
HOW TO REASSEMBE THE POINTER TUN, GEAR TUN AND KNOB RTRY TUN.
KNOB, RTRY TUN GEAR, TUN Turn TUN-CAP fully POINTER, TUN
1. Slot in the POINTER, TUN until point A . 2. With the larger center holes diameter of the GEAR, TUN facing down, insert it into point B followed by point C . 3. Before mounting of KNOB, RTRY TUN confirm POINTER, TUN is fully at point A and turn the TUN-CAP fully, counter-clockwise. 4. Mount the KNOB, RTRY TUN and secure with the screw. 5. TUN KNOB, RTRY TUN to clockwise to confirm POINTER, TUN is able to move to point D .
C
B
AD
6
|