|
|
|
Categories
|
|
Information
|
|
Featured Product
|
|
|
 |
|
|
There are currently no product reviews.
 ;
Absolutely perfect! I've been trying to understand how to use all or at least some of the features of the receiver and especially the remote.
;
Copy of genuine owners/operators manual, very useful
;
The manual was a perfect match and was exactly what I was looking for. I'm very satisfied with my purchase.
;
Thank you for having the manual I needed for an older model Aiwa stero I had found on Ebay --- I wanted the Aiwa because I had tapes and cd's but I did not have a manual as to how to operate the system... I found what I needed and it has enabled me to set the system up for my enjoyment.
;
I wished detailed information of the JBL S310 and here I found it! Very happy with the service from this site!
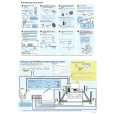
Assembling the speaker stand bases and securing your front and surround (S-FCR4700 only) speakers
Attach the speaker stand bases to the stems using the screws provided. Once you have aligned the stem and base, secure with the small screws at the points shown below. Note that the speaker should face in the direction of the base of the isosceles triangle (outlined below).
Small non-skid pads
Center speaker
Surround speakers (S-FCR3700 only)
Speaker stands (S-FCR3700 only)
Rear
Large non-skid pads Front and Surround (S-FCR4700 only) speakers Subwoofer
Front
OPTIONALLY, ATTACH THE SURROUND SPEAKERS TO THE SPEAKER STANDS (S-FCR3700 ONLY)
For each speaker,line up the spurs on the stand with the holes on the back of the speaker and insert, then secure the speaker to the stand with the screw provided.
Secure each of the front and surround (S-FCR4700 only) speakers using the plastic catch provided. Screw two picture hooks or similar into the wall behind the speaker. Pass a cord around the hooks and through the plastic catch so that the speaker is stabilized (make sure to test that it supports the weight of the speaker). After installing, make sure the speaker is securely fixed.
WALL MOUNTING THE SURROUND (SFCR3700 ONLY) AND CENTER SPEAKERS
Sufficiently thick cord (not supplied) Plastic catch
The surround (S-FCR3700 only) and center speakers have mounting holes which can be used to mount the speaker on the wall.
CAUTION:
� The plastic catch is not a mounting fixture, and the speaker should not be hung directly from the wall using this catch. Always use a cord when stabilizing the speaker. � Pioneer disclaims all responsibility for any losses or damage resulting from improper assembly, installation, insufficient strength of the installation materials, misuse, or natural disasters.
Mounting screw (not supplied) 3/16 in. (5 mm) 3/8 in. (10 mm) 3/16 in. to 1/4 in. (5 mm to 7 mm)
Before mounting (see above), keep in mind the following points:
NON-SKID PADS
Attach the small non-skid pads to the base of the surround (SFCR3700 only) and center speakers. The large non-skid pads are for the front and surround (S-FCR4700 only) speakers, and the subwoofer (as shown). Use the adhesive side of the pads to attach them to the base of each speaker and the subwoofer. If you choose to use speaker stands with the surround speakers, attach the non-skid pads to the stand bases instead of to the underside of the speakers (S-FCR3700 only).
� Remember that the speaker system is heavy and that its weight could cause the screws to work loose, or the wall material to fail to support it, resulting in the speaker falling. Make sure that the wall you intend to mount the speakers on is strong enough to support them. Do not mount on plywood or soft surface walls. � Mounting screws are not supplied. Use screws suitable for the wall material and support the weight of the speaker.
CAUTION:
� If you are unsure of the qualities and strength of the walls, consult a professional for advice. � Pioneer is not responsible for any accidents or damage that result from improper installation.
3
|
|
|
> |
|